- Joined
- Dec 8, 2021
- Messages
- 160
Hi there!


Look at the "Pacing" section. It's usually set to "Standard" by default. Change it to "Accelerated".

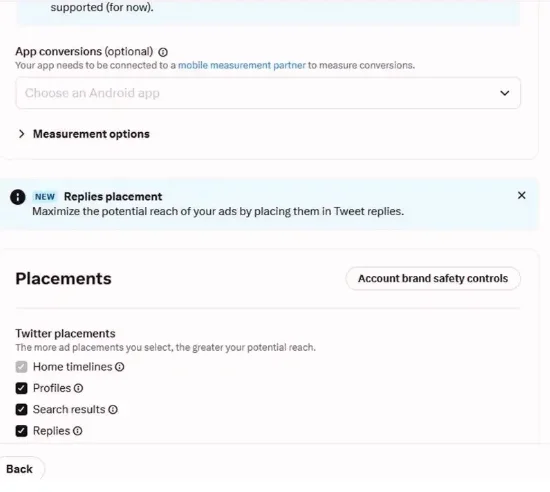
Do exactly what you see in the screenshots.


After finishing the ad setup, launch it. The campaign starts right away, usually without any issues (though sometimes it might fail, don't worry about it, just move on to the next account). Enjoy the results!
This manual will show you how to start advertising your offers properly. Here's what you need to get started:Friends sent me an interesting manual from a paid source. I tried it out and thought I’d share it with the community.
Preparation
- Budget: At least $50.
- Twitter Blue: A card with a minimum $10 balance.
- Anti-detect Browser: I use Gologin (use promo code ADVATAR for 1 month free).
- Proxies: Use Proxylte for clean and stable proxies (promo code PAX5926 for 10% off).
- Funding Card: A card for funding your ads (personal or third-party funds).
Advertising Options
- Farm Accounts
- Accounts from Logs
- Purchased Accounts
- Purchase a Twitter Account:
- Buy a Twitter account from a marketplace with a registration date up to 2016 (any date within the last 2-8 years is fine).
- Set Up Advertising:
- Get a card to buy the Twitter Blue badge.
- Get a card to fund your ads (you can buy one, find one in logs, or use your own money).
- Setting Up:
- Use an anti-detect browser, add the proxy, check the browser profile fingerprint, log in to your account, and buy Twitter Blue.
- Warm Up Your Account:
- Explore different tabs and search for information about advertising on Twitter.
- Create an Ad Campaign:
- Go to Twitter Ads, go to the "Campaigns" section, and select "Create campaign".

- Choose "Advanced":
- In the menu, select "Website traffic."
- Add Your Card:
- Link your card to the account. If one doesn't work, keep trying different cards until it succeeds.
- Set Up Your Ad Campaign:
- Start setting up your advertising campaign.

- Set Budget:
- In "Daily ad group budget," enter an amount less than $170, and use a non-round number (e.g., $120.22). Uncheck "Run Indefinitely" and set the start time for 24 hours from now.
- Choose Link Clicks:
- Scroll down to "Site visit event," and select "Link clicks" from the drop-down menu.


Look at the "Pacing" section. It's usually set to "Standard" by default. Change it to "Accelerated".

Do exactly what you see in the screenshots.


- Choose Age Range:
- Go to the "Age" section, select "Age range," and set it from 21 to 49 years.
- Remove Geolocation:
- Delete the initially selected geolocation, leaving the line empty to include all locations. Tick the boxes to include all devices. You can adjust this according to your advertising needs, but for now, choose all locations and devices.
- Select Audience:
- Instead of writing specific keywords, just choose the audience. This often leads to more effective ads with fewer blocks. Find the most suitable audience for you and select these groups. Aim for a total audience of less than 500 thousand people across all groups.
- You're Done!:
- Congratulations! Your ad is now live. Sit back and enjoy the new audience for your offer. The more you advertise, the bigger your audience will grow. It's that simple.
- Next Step:
- Now, let's set up what users will see in your advertising.

When creating your ad content, avoid mentioning words like crypto, NFT, giveaways, contests, or anything that might suggest you're trying to trick users. Tailor your video to your audience. Since you've selected a crypto audience, focus on getting them to visit your site. I usually use clickbait-style messages, like "Can you believe this works?" to grab their attention.
After finishing the ad setup, launch it. The campaign starts right away, usually without any issues (though sometimes it might fail, don't worry about it, just move on to the next account). Enjoy the results!