- Joined
- May 10, 2021
- Messages
- 243
Instagram Warm-Up Tips
Here’s a friendly guide for safely getting Instagram accounts ready and keeping them running smoothly. These tips show easy steps to avoid getting blocked or banned while setting up accounts for use on real devices.
Note: Following these tips can help lower the chances of getting your account restricted, but sometimes Instagram may still limit accounts because of updates or other changes. The goal is to help your accounts stay active and healthy.
Step 1: Keep Login Info Organized
Most Instagram accounts you get from providers usually come like this:
Username | Password | Email | Email Password
A simple way to keep track is to put all this info in a spreadsheet. This helps you copy and paste logins quickly without making mistakes. We like using Google Sheets and label everything clearly so it’s easy to follow.

Step 2: Sharing Screens to Manage Many Devices
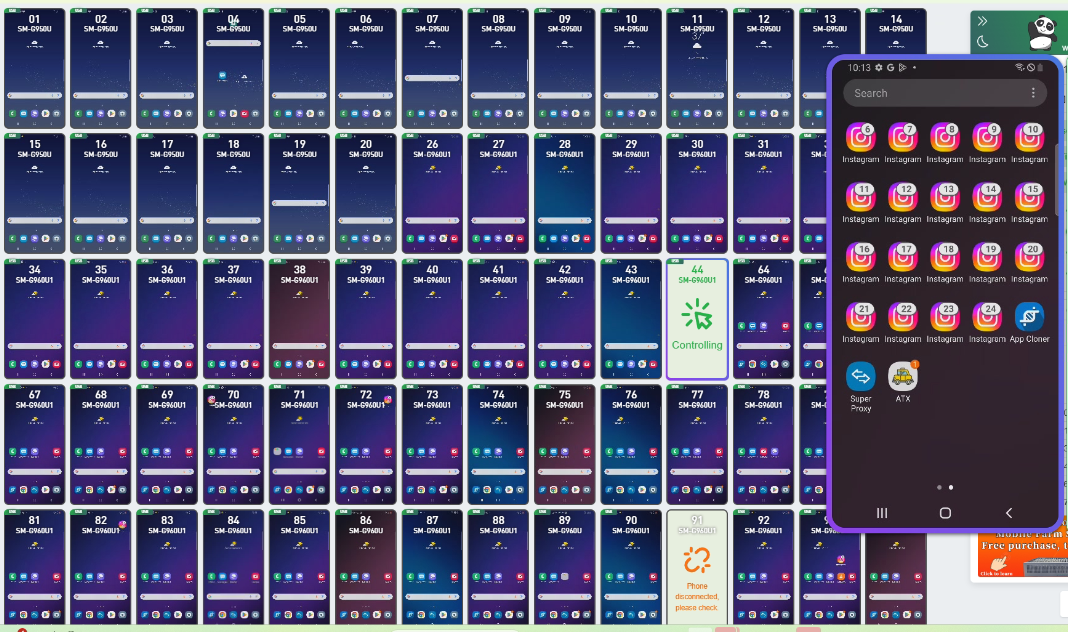
Handling lots of devices is easier with screen-sharing tools. These let you control multiple accounts from one place. Some apps have this built-in, but if you’re working with around 95–105 devices, using a special screen-sharing program is a good idea. There are a few solid options we like, and they all do the same basic job.
Here’s a picture showing how we set it up:

Step 3: Signing Into 7–13 Accounts/Clones Per Device
To stop accounts from being connected when you log in, it’s really important that each session uses its own IP address. You can do this in a couple of ways:
1. Using a SIM Card:
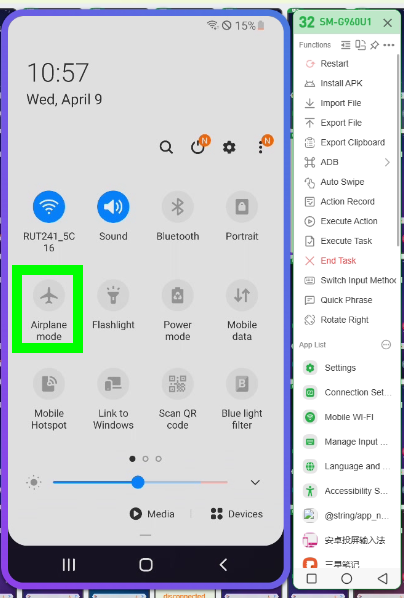
If each device has a separate SIM card, turn airplane mode on and off to get a new IP address.
Log into one account, then switch airplane mode on and off before signing into the next. This way, each account starts from a different IP, even if they end up sharing an IP later. The main rule is to never log in multiple accounts on the same IP at the same time.

2. Using a Proxy:
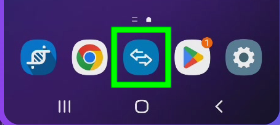
You can use a 4G proxy with a proxy app to switch IP addresses between logins. Connect the proxy to your app, then change the IP through your provider’s dashboard before signing into each new account. This keeps accounts from getting linked because each one looks like it’s coming from a different IP.
For bigger setups (like 90–110 devices), using a proxy is usually the easier way to go.


Step 4: Warm-Up Routine
At this point, all accounts can usually use the same IP without problems. But it’s very important to turn on your proxy (or flip airplane mode if you’re using a SIM card) whenever you change account details like your username, display name, bio, or profile picture. This helps avoid red flags because Instagram may notice if many accounts make changes from the same IP at once, which can look like automated behavior.
Instagram is usually fine if multiple accounts share an IP for normal activity—liking posts, watching stories, etc.—because that’s normal on a 4G network. Problems happen when lots of accounts do big updates from the same IP.
Whenever this guide says to rotate the proxy, just open your proxy app, turn it on, make the changes, and turn it off before continuing your usual actions. Every setup can act a little differently, so it’s smart to test and tweak things to see what works best for you.
Post-Warm-Up Activity Limits:
I hope this guide was helpful! If you have any questions, just leave a comment below, and I’ll read them and get back to you.
Here’s a friendly guide for safely getting Instagram accounts ready and keeping them running smoothly. These tips show easy steps to avoid getting blocked or banned while setting up accounts for use on real devices.
Note: Following these tips can help lower the chances of getting your account restricted, but sometimes Instagram may still limit accounts because of updates or other changes. The goal is to help your accounts stay active and healthy.
Step 1: Keep Login Info Organized
Most Instagram accounts you get from providers usually come like this:
Username | Password | Email | Email Password
A simple way to keep track is to put all this info in a spreadsheet. This helps you copy and paste logins quickly without making mistakes. We like using Google Sheets and label everything clearly so it’s easy to follow.

Step 2: Sharing Screens to Manage Many Devices
Handling lots of devices is easier with screen-sharing tools. These let you control multiple accounts from one place. Some apps have this built-in, but if you’re working with around 95–105 devices, using a special screen-sharing program is a good idea. There are a few solid options we like, and they all do the same basic job.
Here’s a picture showing how we set it up:

Step 3: Signing Into 7–13 Accounts/Clones Per Device
To stop accounts from being connected when you log in, it’s really important that each session uses its own IP address. You can do this in a couple of ways:
1. Using a SIM Card:
If each device has a separate SIM card, turn airplane mode on and off to get a new IP address.
Log into one account, then switch airplane mode on and off before signing into the next. This way, each account starts from a different IP, even if they end up sharing an IP later. The main rule is to never log in multiple accounts on the same IP at the same time.

2. Using a Proxy:
You can use a 4G proxy with a proxy app to switch IP addresses between logins. Connect the proxy to your app, then change the IP through your provider’s dashboard before signing into each new account. This keeps accounts from getting linked because each one looks like it’s coming from a different IP.
For bigger setups (like 90–110 devices), using a proxy is usually the easier way to go.


Step 4: Warm-Up Routine
- Day 1: Log in + view 9–16 stories
- Day 2: View 9–16 stories
- Day 3: View 9–16 stories
- Day 4: View 9–16 stories
- Day 5: Change your username + view stories (make sure proxy is on and rotate each account)
- Day 6: Change your display name + view stories (proxy on, rotate accounts)
- Day 7: Update bio/profile pic + add 1 photo + view stories (proxy on, rotate accounts)
- Day 8: Follow 4 accounts
- Day 9: Follow 5 accounts
- Day 10: Take a break
- Day 11: Take a break
- Day 12: Follow 6 accounts
- Day 13: Follow 7 accounts
- Day 14: Follow 8 accounts
- Day 15: Follow 9 accounts
- Day 16: Rest + add a link to your bio (1 link can be shared across 3–5 accounts)
- Day 17: Take a break
- Day 18: Your account should be warmed up; see the new limits below
At this point, all accounts can usually use the same IP without problems. But it’s very important to turn on your proxy (or flip airplane mode if you’re using a SIM card) whenever you change account details like your username, display name, bio, or profile picture. This helps avoid red flags because Instagram may notice if many accounts make changes from the same IP at once, which can look like automated behavior.
Instagram is usually fine if multiple accounts share an IP for normal activity—liking posts, watching stories, etc.—because that’s normal on a 4G network. Problems happen when lots of accounts do big updates from the same IP.
Whenever this guide says to rotate the proxy, just open your proxy app, turn it on, make the changes, and turn it off before continuing your usual actions. Every setup can act a little differently, so it’s smart to test and tweak things to see what works best for you.
Post-Warm-Up Activity Limits:
- Follow: 3–7 per hour, 18–32 per day
- Unfollow: 7–13 per hour, 18–32 per day
- Likes: 11–16 per hour, 65–95 per day
- Comments: 1–4 per hour, 6–11 per day
- DMs to New Followers: 2–6 per hour, 9–16 per day
I hope this guide was helpful! If you have any questions, just leave a comment below, and I’ll read them and get back to you.