- Joined
- Apr 7, 2017
- Messages
- 13,312

Are you interested in installing Google Analytics on your WordPress website? Understanding how your audience interacts with your site is essential to achieving success. Google Analytics is a free tool that provides valuable traffic statistics to help you better understand your audience.
In this article, we'll explain why Google Analytics is important and provide a step-by-step guide on how to install it on your WordPress site. By the end of this article, you'll be able to track your website's performance and gain insights into your audience's behavior.

This article will provide you with a comprehensive guide to Google Analytics for WordPress. We'll start by explaining why Google Analytics is so important and how it can help you grow your website.
Next, we'll show you how to sign up for a Google Analytics account and walk you through several different methods to install it on your WordPress site. We'll cover everything from the recommended method using MonsterInsights, to more advanced methods like installing it in your WordPress theme.
Once you've successfully installed Google Analytics, we'll explain how to set up dual tracking when using Universal Analytics. We'll also show you how to view your traffic reports in Google Analytics, so you can start analyzing your data right away.
Finally, we'll offer some tips on how to make the most out of Google Analytics and provide additional resources to help you get the most out of this powerful tool.
So whether you're new to Google Analytics or looking to take your tracking to the next level, this guide has got you covered. Let's get started!
Why is Google Analytics Important for Bloggers?
The primary objective after starting a blog is to increase traffic and gain more subscribers. Google Analytics is a valuable tool that enables you to make informed decisions based on essential statistics. With this tool, you can access information such as:
Who visits your website?
This part of analytics is commonly referred to as "User Analytics" or "Audience Analytics". It involves collecting and analyzing data on the characteristics and behaviors of your website visitors.
The information gathered can help you understand your audience better and make data-driven decisions to improve your website's performance. For example, you can use this data to optimize your website's user experience, improve engagement, and increase conversions.
In addition to the examples you mentioned, user analytics can also provide insights into user behavior, such as how users navigate your site, which pages they visit the most, how long they spend on each page, and where they drop off. This information can help you identify areas where your website can be optimized to improve user engagement and conversion rates.
Overall, user analytics plays an important role in improving your website's performance and user experience. By understanding your audience's characteristics and behavior, you can make informed decisions that can help you achieve your business goals.
What do people do when they are on your website?
It is possible to monitor the activity of users on your website, such as their browsing path, the duration of their stay, and the bounce rate (the percentage of users who leave after the first visit).
This data can be used to reduce the bounce rate and increase the number of pageviews.
Additionally, you can identify your most popular articles, articles that are underperforming, and the type of content that your users are searching for.
When do people visit your website?
Analyzing the peak traffic hours of your website can help you determine the optimal time to publish your posts. If your time zone is different from your target audience's, you can schedule your post to align with their most active hours.
How do people find your website?
This analytics section displays the origin of your website's users, revealing if they used search engines, direct links, or referral links from other sites. Additionally, it presents the percentage of visitors that came from each source, with Google Analytics providing a breakdown for each category. In the case of search engines, it reveals which engine generated the most traffic, such as Google, Yahoo, or Bing.
The referral source breakdown highlights the sites that require more attention. For instance, if Facebook is your top referral source, it's essential to offer unique content to your Facebook audience. On the other hand, if an external website is the top referral source, you may want to consider partnering with that website, such as through guest post exchange.
How do people interact with your content?
Google Analytics provides insights into how users engage with your website's content, such as the percentage of clicks on each link. Additionally, you can conduct A/B split tests by creating content experiments in Google Analytics to determine which strategies are most effective in achieving your objectives. By analyzing user behavior, you can tailor your content to their needs and preferences, and use this information to focus on successful strategies while avoiding those that are not effective. Ultimately, this approach allows you to eliminate guesswork and make data-driven decisions based on meaningful statistics.
How to Sign Up with Google Analytics
Google Analytics allows you to gain insights into how your website visitors engage with your content. Through this platform, you can track which links on your site are being clicked on and gather other relevant data.
Additionally, you can create content experiments through A/B split testing in Google Analytics, which can help you determine which strategies are most effective in meeting your goals.
By analyzing user behavior, you can tailor your content to better suit the needs and preferences of your audience. This allows you to focus on effective strategies and avoid those that are not delivering the desired results.
Ultimately, Google Analytics helps you to make data-driven decisions based on relevant statistics, enabling you to eliminate guesswork and achieve better outcomes for your website.
How to Sign Up with Google Analytics
Google Analytics is a free tool that can be accessed with a Google or Gmail account. Creating an account is a straightforward process that involves following a few simple steps:
Step 1: Go to the Google Analytics website and click on the "Get started today" button.

After clicking the "Get started today" button, you will be prompted to log in with your Google account. If you already have a Google or Gmail account, you can use those credentials to sign in. If you don't have an account, you can create one during the sign-up process.

Step 2:
After logging in with your Google or Gmail account, you will be directed to a welcome screen. On this screen, you will see an option to sign up for Google Analytics using your Gmail account. Simply click the "Start measuring" button to proceed with the sign-up process.

Following that, you will be prompted to provide an account name for your Google Analytics account. This name is for internal use, so you can choose anything that suits your business or personal preference.
In addition, you will be presented with various account data sharing options in Google Analytics. These settings allow you to control the sharing of your Google Analytics data. You can choose to keep the default settings and proceed to the next step.

Step 3: On the next screen, you will need to create a Google Analytics property.
Google has recently launched the latest version of its Analytics tool known as Google Analytics 4 or GA4. This updated version allows you to track your website and mobile apps using a single account and provides new features, metrics, and a different interface for generating reports.
It is important to note that if you already have a Universal Analytics account, it is crucial to begin tracking data in GA4 as well, as Universal Analytics will be phased out on July 1, 2023. After this date, Universal Analytics will no longer receive any data and will eventually cease to function.
If you set up a GA4 property after the sunset date, you will need to start from scratch. However, you can begin sending data to GA4 while still using Universal Analytics. This will enable you to have historical data in GA4 for comparison and analysis when Universal Analytics is discontinued.
To get started, simply provide a property name and select your reporting time zone and currency, and then click the "Next" button.

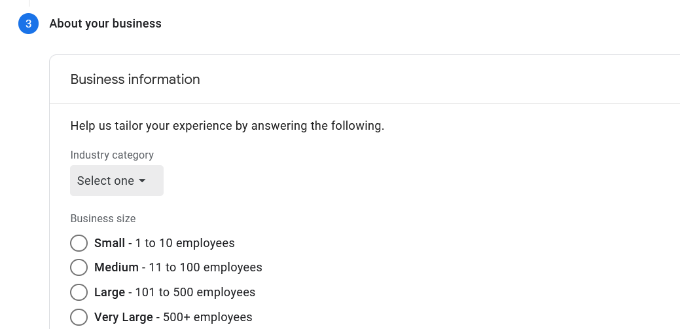
On the following screen, you will be prompted to select an "Industry category" from the dropdown menu for your website, and to choose a "Business size" from the available options.

Afterwards, you should scroll down and indicate how you plan to use Google Analytics for your business, such as measuring engagement, optimizing advertising costs, increasing conversions, and other purposes. You have the option to select multiple or all of the given choices that align with your objectives. Once you have made your selections, click on the "Create" button to proceed.

Upon clicking the "Create" button, a pop-up window will appear with the terms of service agreement for Google Analytics. Simply check the box for "I also accept the Data Processing Terms as required by GDPR" and then click on the "I Accept" button.

Afterwards, you will be presented with a pop-up containing options for selecting which communication emails you wish to receive from Google Analytics. Check the box for the updates that you want to receive and then click on the "Save" button.

Step 4: You will now be presented with the options for your Google Analytics Web stream.
As you are setting up Google Analytics for a WordPress website, please select the "Web" option as the platform.

Firstly, you will be required to provide your website URL and Stream name.
The Enhanced measurement option will be enabled by default in Google Analytics. This feature allows you to monitor page views, scrolls, outbound clicks, file downloads, and other metrics in Google Analytics.
Afterwards, you may click on the ‘Create stream’ button.

Upon completion, you will be able to view your Stream URL, name, and Measurement ID. In addition, Google Analytics will display the various enhanced measurements that it will capture.
Under the 'Tagging Instructions' section, Google Analytics will present you with various methods to integrate the Google Analytics code into your WordPress website.
If you opt for the 'Global site tag (gtag.js)' option, you will be provided with the Google Analytics tracking code.

Feel free to use this tracking code as you will need to input it into your WordPress site, depending on the method you choose below. Alternatively, you can keep this browser tab open and switch back to copy the code when necessary.
We recommend keeping the Analytics browser tab open, as you may need to return to it later after you've installed the code on your WordPress site.
With your Google Analytics account set up, let's explore the steps for installing Google Analytics in WordPress.
How to Install Google Analytics in WordPress
There are multiple ways to configure Google Analytics in WordPress, and we'll cover three methods here. The first option is the simplest, while the last is the most challenging.
You can select the approach that best fits your requirements.
Please note that you should only employ one of these techniques on your website to prevent page views from being double-counted in your Google Analytics account.
Method 1. Google Analytics for WordPress by MonsterInsights
MonsterInsights is the leading Google Analytics plugin for WordPress, with over 3 million websites using it, including notable brands like Bloomberg, PlayStation, Zillow, and WPBeginner.
It is the easiest and most effective way for both beginners and experts to add Google Analytics to WordPress. Additionally, it offers a Dual Tracking feature that enables you to include both Universal Analytics and Google Analytics 4 on your WordPress website without requiring any coding.
MonsterInsights is available in both a paid premium version and a free version, which we will use in this tutorial. If you require more advanced features like eCommerce tracking, Ads tracking, or Author tracking, you may want to consider upgrading to the MonsterInsights Pro version. The setup procedure is identical.
Let's get started!
The first step is to install and activate the MonsterInsights plugin. You can follow our step-by-step guide on how to install a WordPress plugin for more information.
After activation, the plugin will add an 'Insights' menu item to your WordPress admin menu, and you'll see a welcome screen. Click the 'Launch the Wizard' button to proceed.

When you click on the 'Launch the Wizard' button, the MonsterInsights setup wizard will appear.
The first step is to choose a category for your website, such as a business website, blog, or online store. Choose one and then click on the 'Save and Continue' button to proceed.

The next step is to connect MonsterInsights with your WordPress website.
To do so, click on the 'Connect MonsterInsights' button.

Clicking on the 'Connect MonsterInsights' button will redirect you to Google accounts, where you will be prompted to sign in or select a Google account if you are already signed in.
Select your Google account or enter your email to sign in.

After signing in, you will be prompted to grant MonsterInsights access to your Google Analytics account.
Click on the 'Allow' button to proceed.

The next step is to select the profile you want to track in MonsterInsights.
Choose your website from the options provided and then click on the 'Complete Connection' button to proceed.

Once you have selected your website profile, click on the 'Complete Connection' button to continue. MonsterInsights will now install Google Analytics on your website.
The next step is to select the recommended settings for your website.

For most websites, the default settings in MonsterInsights should work just fine. However, if you use an affiliate link plugin, you will need to add the path you use to cloak affiliate links. This will allow you to track your affiliate links in Google Analytics.
MonsterInsights will also ask you to specify who can view the reports. You can choose different WordPress user roles. Once you have made your selections, click on the 'Save and Continue' button to save your settings.

MonsterInsights will provide you with a list of website tracking features that you can choose to enable. You have the option to either scroll down and select the ‘Continue’ button or skip for now by choosing the ‘Skip for Now’ option.

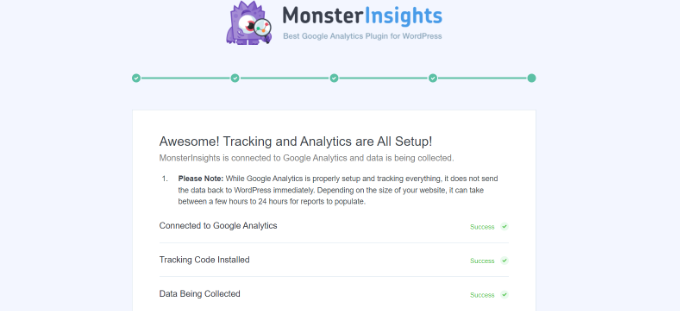
On the following screen, MonsterInsights will confirm that you have successfully set up Google Analytics tracking. You will be able to verify that Google Analytics is connected, the tracking code has been installed, and that data is now being collected.

You will then be prompted to scroll down and find a field where you can enter your license key. However, if you do not have a license key or do not wish to upgrade at this time, you can simply select the ‘Complete Setup without Upgrading’ option.

Congratulations! You have successfully integrated Google Analytics with your WordPress website.
Now, to enable MonsterInsights to track events such as eCommerce purchases and form conversions, you will need to create a Measure Protocol API Secret. To get started, log in to your Google Analytics account and navigate to the ‘Admin’ settings page. From there, click on the ‘Data Streams’ option.

Once you are on the ‘Data Streams’ page, you will see a list of your data streams. Find the one that you connected with MonsterInsights and select it.

After selecting the appropriate data stream, scroll down to the ‘Advanced Settings’ section on the next page. From there, click on the ‘Measure Protocol API Secrets’ option.

Once you have clicked on the ‘Measure Protocol API Secrets’ option, a new window will slide in displaying your Measurement Protocol API Secrets. Initially, this page will be empty, and you will not have any API secrets. To create one, simply click on the ‘Create’ button.

After clicking on the ‘Create’ button, you will be prompted to enter a nickname for your API secret. Once you have entered a nickname, click on the ‘Create’ button again to proceed.

Congratulations! Your API secret has now been created. To use it, simply copy the API secret located under the ‘Secret Value’ field.

To use your newly created API secret in MonsterInsights, navigate to the ‘Insights » Settings’ section from your WordPress admin panel. From there, select the ‘General’ tab.

Once you are on the ‘General’ tab of MonsterInsights settings, find the ‘Google Authentication’ section. From there, locate the ‘Measurement Protocol API Secret’ field and enter your API secret that you copied earlier.

Congratulations! You have now successfully set up the Measurement Protocol API Secret in MonsterInsights. Now, let's move on to the next step, which is to learn how to use dual tracking in MonsterInsights if you have a Universal Analytics account.
How to Set Up Dual Tracking When Using Universal Analytics
If you are already using a Universal Analytics account, MonsterInsights makes it extremely easy to track both Universal Analytics and Google Analytics 4 with its Dual Tracking feature. The best part is that you do not need to edit any code to use this feature.
However, it is important to note that Universal Analytics will sunset on July 1, 2023, and you will not be able to track your website data using this platform after that date. Therefore, it is highly recommended that you set up a Google Analytics 4 property and begin sending data to it as soon as possible.
To set up dual tracking in MonsterInsights, begin by navigating to the ‘Insights » Settings’ section from your WordPress dashboard. From there, select the ‘General’ tab.

Once you are on the ‘General’ tab of MonsterInsights settings, scroll down to the ‘Google Authentication’ section. Here, you will find the ‘Dual Tracking Profile’ field where you can enter your Universal Analytics (UA) code.

To find your Universal Analytics code in Google Analytics, follow these steps:

Log in to your Google Analytics account.
Go to the ‘Admin’ settings page by clicking on the gear icon in the bottom left corner of the screen.
Under the ‘Property’ column, select the website for which you want to find the Universal Analytics code.
Under the ‘Property’ column, click on the ‘Tracking Info’ tab.
In the ‘Tracking Code’ section, you will find your Universal Analytics code, which begins with ‘UA-’.
Next, locate the 'Property Settings' option under the 'Property' column and select it. From there, you should be able to find the 'Tracking Id' in the format of UA-123456789-1.

Congratulations, you have successfully set up Universal Analytics tracking with Google Analytics 4 on your WordPress website. Please note that it may take some time for Google Analytics to display your statistics.
One of the great benefits of using MonsterInsights is the ability to view your Google Analytics reports directly from your WordPress dashboard. To access your analytics data, simply navigate to the 'Insights' and then the 'Reports' page, where you can view a comprehensive overview of your website's performance.

Additionally, MonsterInsights offers a Popular Posts add-on which enables you to display your most popular content, thereby increasing your website's traffic and pageviews.

This add-on also allows you to enhance engagement on your website by automatically inserting inline links to your popular posts. Furthermore, if you run an online store, the Popular Posts add-on can dynamically display your top-selling products at the end of each blog post, thereby increasing your chances of generating more sales.
It is important to note that MonsterInsights was previously named 'Google Analytics for WordPress' by Yoast. In 2016, the plugin was acquired by Syed Balkhi, the founder of WPBeginner, and rebranded as MonsterInsights. Since then, it has become a part of our premium WordPress plugin family.
Method 2. WPCode Plugin
Compared to MonsterInsights, this method may not be as effective since it does not offer advanced tracking configuration and the ability to view Google Analytics data directly in your WordPress dashboard.
To begin, you will need to retrieve the Google Analytics tracking code (Global site tag) that you copied in Step 4 when setting up your Google Analytics account. This code can be found in the 'Tagging Instructions' section located within the Web stream details.

After retrieving the tracking code, you will need to install and activate the WPCode plugin on your WordPress website. If you are unfamiliar with this process, you can refer to our step-by-step guide on how to install a WordPress plugin.
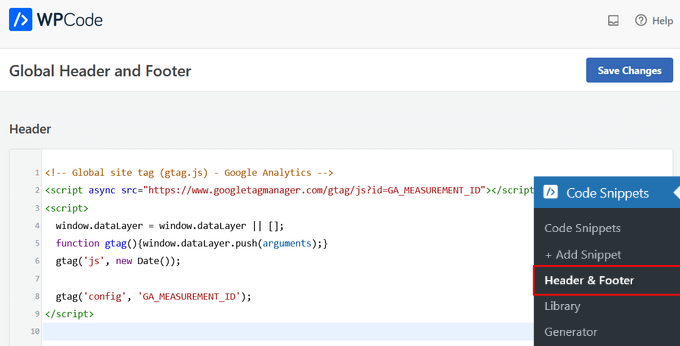
Once WPCode is activated, navigate to the 'Code Snippets' page, and select the 'Header & Footer' section. From there, you can paste the Google Analytics tracking code that you previously copied into the 'Header' section.

Be sure to click the 'Save Changes' button to save your settings after pasting the tracking code.
Congratulations! You have now successfully installed Google Analytics on your WordPress website.
3. Install Google Analytics in WordPress Theme
Please note that this method is only recommended for advanced users who are familiar with coding. Additionally, it can be somewhat unreliable since the tracking code may disappear if you switch or update your WordPress theme.
For those who are new to adding code to WordPress files, we recommend reviewing our guide on how to copy and paste code snippets in WordPress.
To begin, copy the Google Analytics tracking code that you retrieved in Step 4 from the 'Tagging Instructions' section within the Web stream details.
Please note that there are two common ways to add this tracking code to your WordPress theme files. You should only choose one of these methods (not both).

1. Add code in header.php file
One method involves editing the header.php file in your WordPress theme and pasting the Google Analytics tracking code that you copied earlier directly after the <body> tag. After making changes, be sure to save them and upload the file back to your server.
2. Add via Functions File
Another method involves adding the Google Analytics tracking code to the WordPress functions file. This will automatically add the tracking code to every page on your WordPress site.
To do this, you will need to add the tracking code to your theme's functions.php file.
| 1 2 3 4 5 6 7 | <?php add_action('wp_head', 'wpb_add_googleanalytics'); function wpb_add_googleanalytics() { ?> // Paste your Google Analytics tracking code from Step 4 here <?php } ?> |
Viewing Reports on Google Analytics Website
Google Analytics is capable of providing a wealth of data based on your website's traffic and user behavior. To view this data, you can access your Google Analytics dashboard.

Once you access your Google Analytics dashboard, you will see various built-in reports listed in the left column. Each section is divided into different tabs, and clicking on a tab will expand it to show more options.
Here's a breakdown of what the different reports in Universal Analytics can tell you:
-The Real-time report provides a real-time view of your website's traffic.
-The Audience tab includes reports that help you understand your website's users.
-The Acquisition reports explore where your website's users came from.
-The Behavior reports summarize what your website's users do after they arrive on your site.
-The Conversion reports show how well your website is performing against its goals.
You can access similar reports in Google Analytics 4 as well.

The reports in Google Analytics 4 differ from those in Universal Analytics. Instead of being grouped by Acquisition, Behavior, and Conversions, the reports in GA4 are grouped into two main categories: Life Cycle and User, which you can access through the dedicated Reports option in the left column.
One significant difference in GA4 is the absence of the bounce rate metric. However, there are new metrics such as engagement time, and there are no goals in GA4. Moreover, the reporting interface is entirely new.
Google Analytics 4 offers a wide range of features, reports, and metrics, and more are expected to be added soon. This is because the development of Universal Analytics has ceased, and it is set to sunset in July 2023.
Here is a summary of the different reports in Google Analytics 4:
-Realtime report: shows active users on your site in real-time, similar to Universal Analytics.
-Acquisition report: shows the medium users use to find your website, including organic, referral, email, and affiliate.
-Engagement report: shows conversions and events that occur on your website.
-Monetization report: brings all your eCommerce data together and includes new reports such as In-app purchases and Publisher ads.
-Retention report: shows new versus returning visitors and provides insights about user retention.
-Demographics: provides insights into website traffic from top countries, cities, and more, along with gender breakdown and interest reports.
-Tech report: shows the most commonly used devices, browsers, operating systems, app versions, and screen sizes people use to view your website.
Making the Most out of Google Analytics
Google Analytics is an incredibly powerful tool that offers a range of features, some of which are easy to use, while others require additional setup. Here are some resources that can help you get the most out of Google Analytics reports:
-Track user engagement in WordPress with Google Analytics
-Track WooCommerce customers in Google Analytics
-Track outbound links in WordPress
-WordPress Conversion Tracking Made Simple – A Step-by-step guide
Google Analytics works best with Google Search Console (formerly known as Google Webmaster Tools). This tool allows you to see how your website is performing in search results. Check out our comprehensive Google Search Console guide to learn how to use it to grow your website.
To improve your WordPress SEO rankings and get more traffic, we recommend using the AIOSEO plugin, an all-in-one SEO toolkit for WordPress. There is also a free version of AIOSEO that you can use.
This plugin will help you optimize your WordPress site with proper schema markup, sitemaps, and everything you need to improve your SEO rankings.
If you want to learn more about increasing your blog traffic and comparing the best email marketing services, please check out our ultimate guide to these topics.
If you found this article helpful, please subscribe to our YouTube channel for WordPress video tutorials. You can also find us on Twitter and Facebook.