- Joined
- Apr 7, 2017
- Messages
- 13,103
- Thread Author
- #1
1.INTRO
 New to WordPress? Here's Exactly Where You Should Start!
Welcome to MMOLEARN.COM — your go-to place for learning how to build a professional WordPress website, even if you're starting from scratch.
Learn how to create a dropshipping store, eCommerce site, or any type of website with ease - no technical struggles required.
Plus, here you’ll find useful information on how to start making money online and more.
But for now, we’ll focus on showing you how to build a website from A to Z.
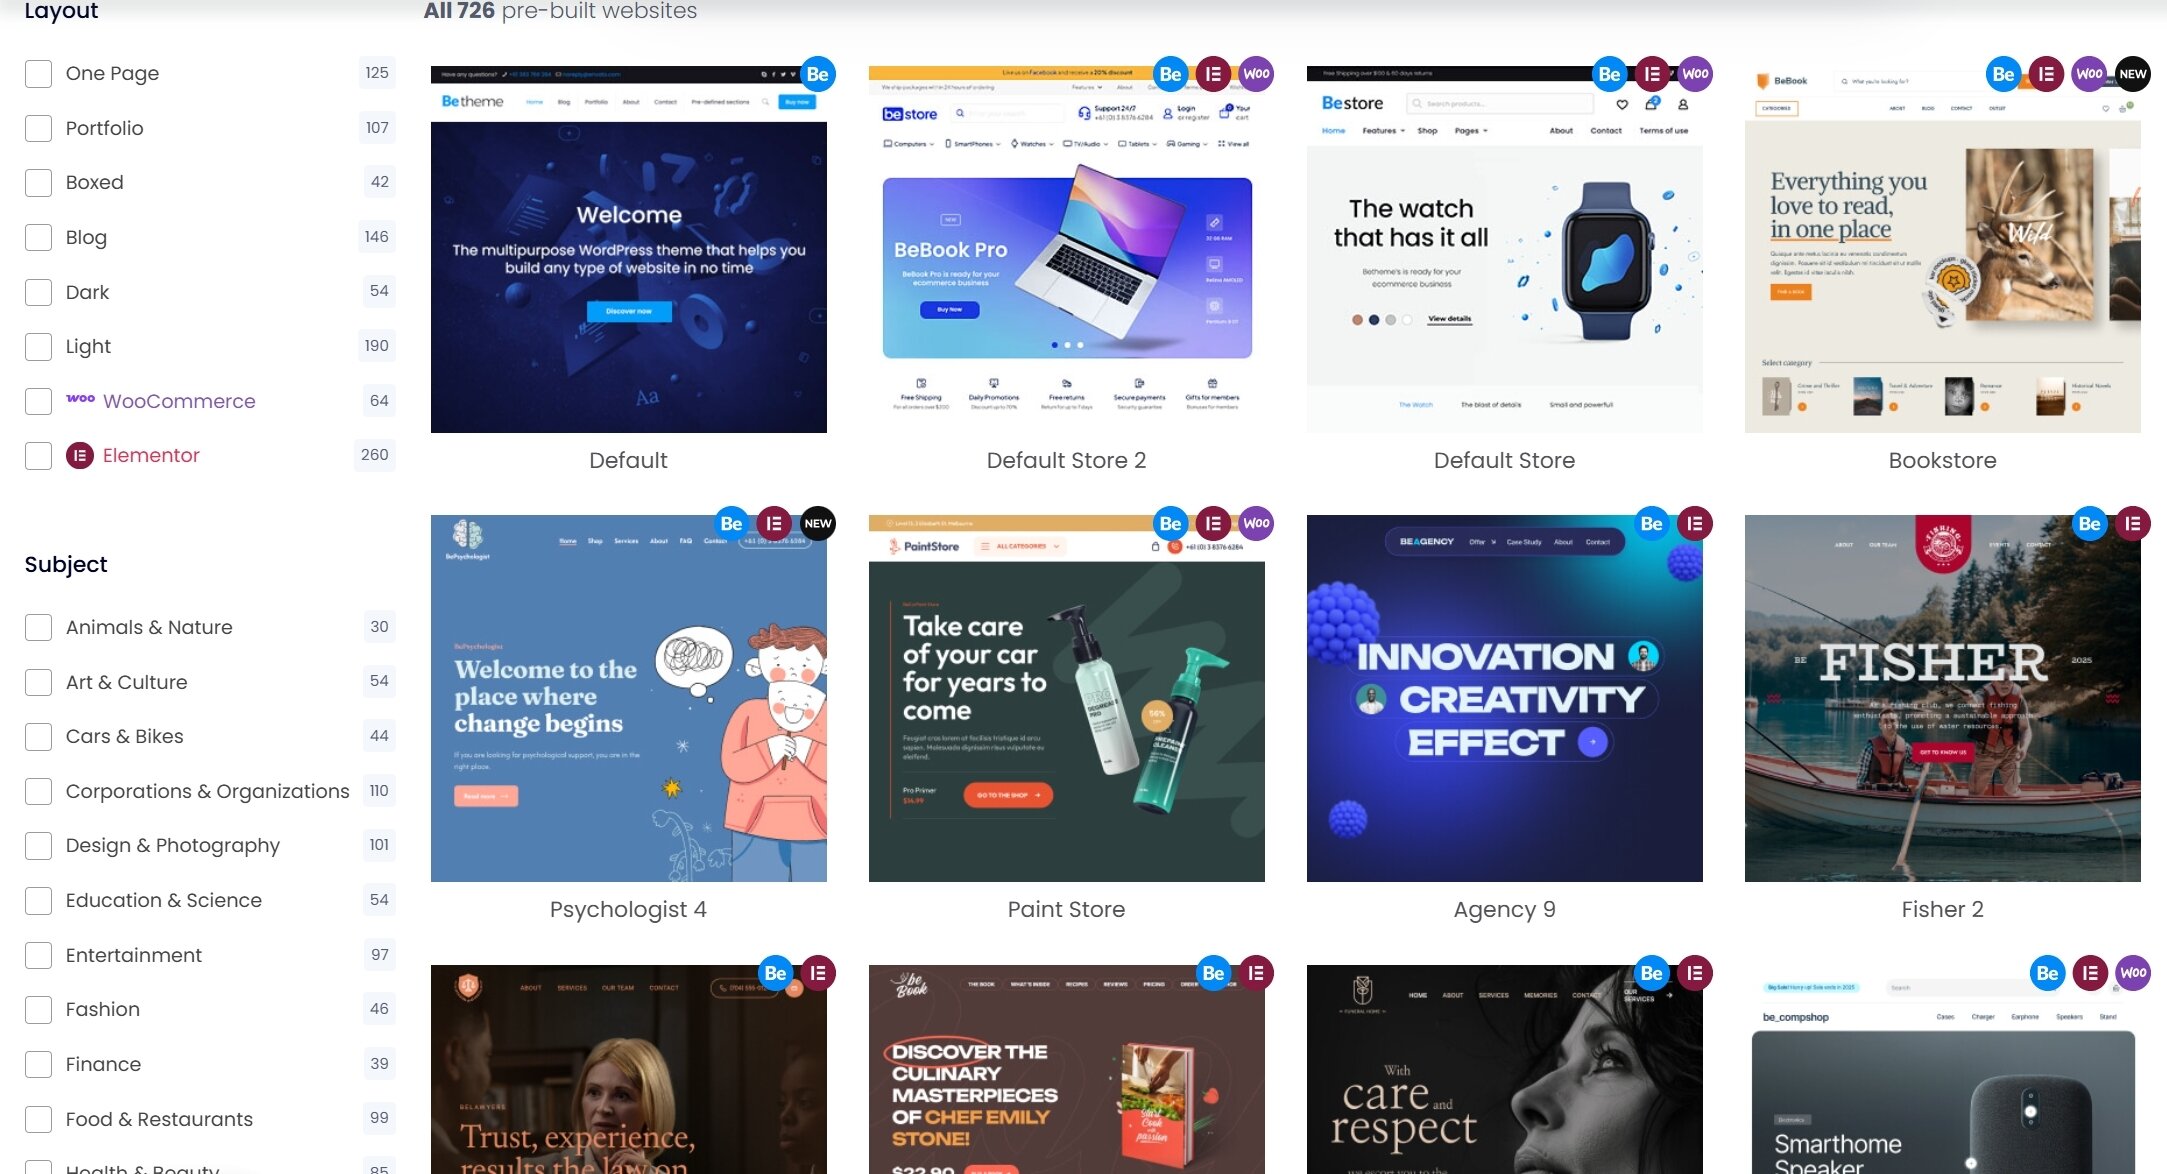
This is the plugin we’re going to use for demo imports.
Yes, with just a couple of clicks, you can import any of these websites by following this tutorial!
Plus, once you have affordable hosting, you can run multiple websites at no extra cost — 1, 2, even 10 websites — you can do it all!
Those 2-click demo import websites cover all kinds of niches — whether it's a dropshipping eCommerce store, a hair salon, a tech site, a gym, you name it.
There are over 50 niches, and each niche has more than 2 design options available!
Open this link and go down ->
If you're asking:
“Where do I start with WordPress?”
The answer is simple:
It’s not the year 2000 anymore — you don’t need to be an expert to use WordPress.
All themes are premade and come with drag-and-drop builders, just like Shopify.
But unlike Shopify, WordPress puts you in control.
The themes or plugins you purchase are yours to keep.
With Shopify, your store only stays online as long as you keep paying a monthly fee of $50+, plus $50–$500 per month for add-ons. It’s all just a service. The moment you stop paying, your Shopify store and any add-ons are cancelled.
With WordPress, once you buy the plugins you need, they’re yours for life.
Once you cover the initial cost to build your site, it only takes a few dollars a month to keep it running — and yes, you can run 5, 10, even 50 different websites if you want!
You can even sell plugins or add-ons you no longer use on MMOLearn to other members and get your money back.
 Web Hosting - 3$-5$ a month.
This is like renting a computer that's online 24/7 — it keeps your website alive and accessible to the world. Themes &
  Plugins - 5$-50$ one time payment, with MMOLEARN VIP Subscription you will save thousands - and 0$ once your website is setup.
We’ve got thousands of premium GPL themes and plugins — all ready to supercharge your website. A Domain Name - 1$-12$ for 1 year.
This is your website’s address (like example.com).
 TIP: If you just want to practice building a site and aren't ready to go live, you can skip buying a domain. Just select “I have my own domain” and type in anything random when buying hosting.
So basically, running your store — or even 10 different websites — costs only about $30–$40 per year to maintain.
Meanwhile, with Shopify, just one month costs around $30, thats WITHOUT ADDONS!
With WordPress, plugins and add-ons are YOUR`S to keep once you own them, and they dont require monthly payments to keep running unlike shopify.
With Shopify, you’re paying $30 to $500 every month per plugin or add-on just to keep them active for 30 days, in wordpress it`s yours for lifetime.
| Feature | WordPress | Shopify |
|---|---|---|
| Ownership | ||
| Monthly Fees | ||
| Customization | ||
| Monetization Freedom | ||
| Long-Term Cost | ||
| Add-ons / Plugins | ||
| Website Types | ||
| Scalability |
 All the Tools You Need — Provided by MMOLEARN.COM
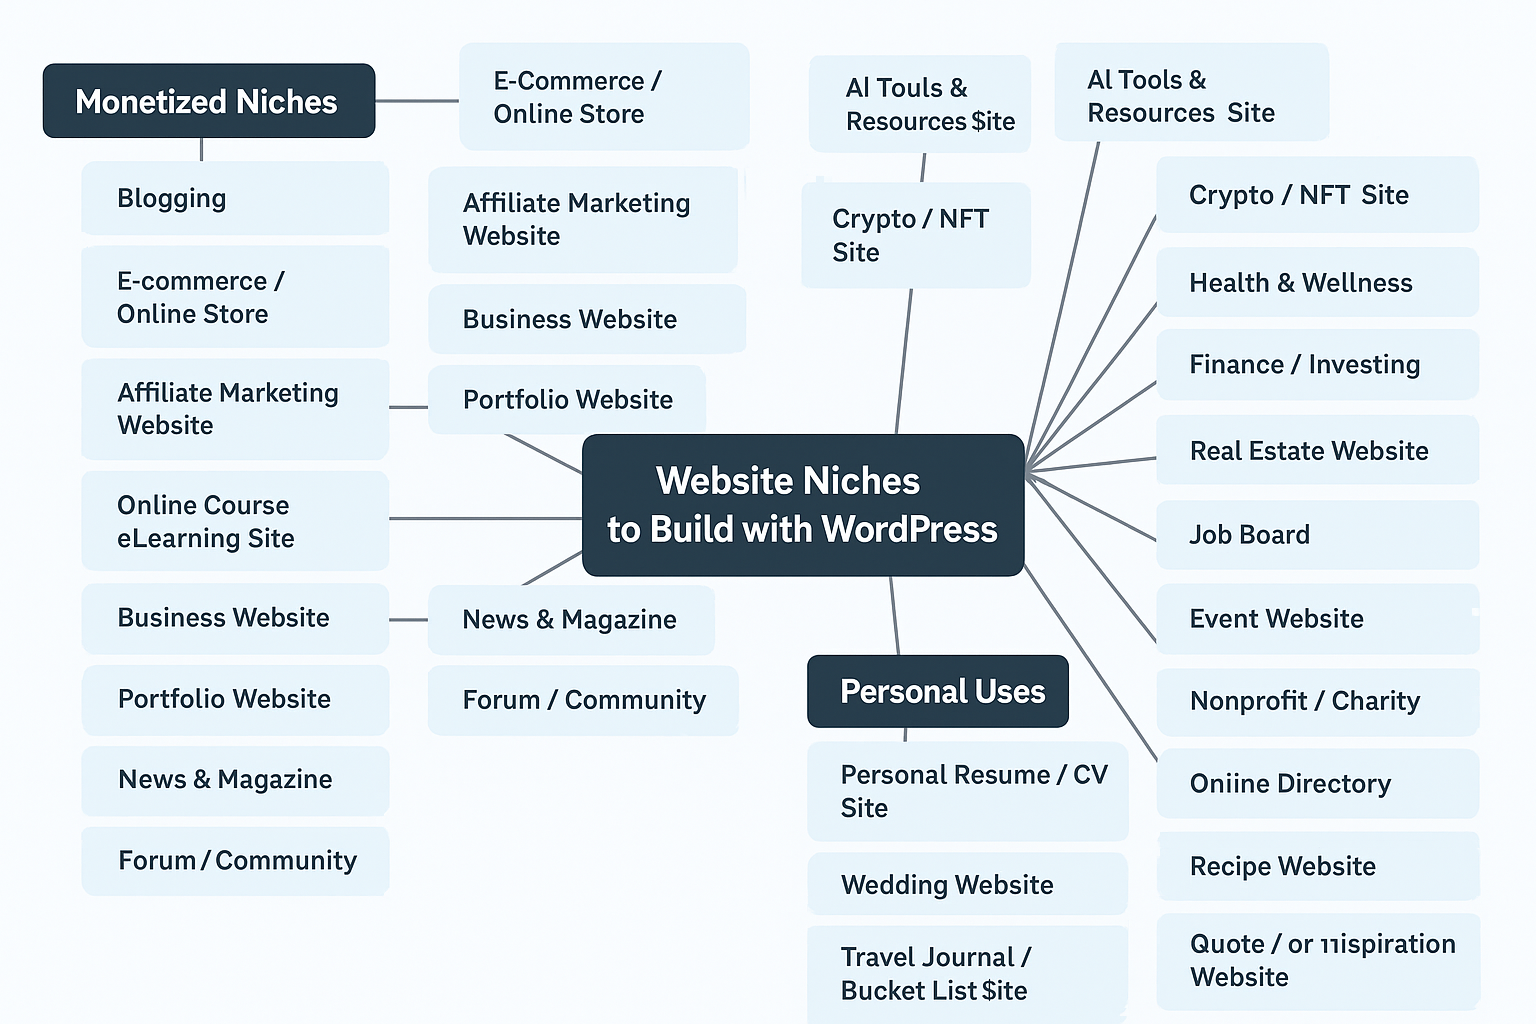
What type of websites you can build using wordpres -
E-commerce & Online Stores
Blogs / Content-Based Sites
Business / Local Services Sites
Portfolios / Resumes / CVs
Online Learning / Course Websites
Media / Entertainment Sites
Directories / Listings
Communities & Social Networks
Landing Pages & Funnels
Agencies & Service Businesses
Nonprofits / Charities / Religious Sites
Finance / Money Sites
Health / Fitness / Wellness Sites
Tech / SaaS / Startup Sites
Event / Booking Sites
Travel / Booking Sites
Pet / Animal-Related Sites
DIY / Craft / Hobby Niches
Spiritual / Esoteric / New Age Sites
- Print-on-demand stores
- Dropshipping websites
- Clothing stores
- Handmade / crafts stores
- One-product stores
- Digital product stores (eBooks, templates, music)
- Subscription box websites
- Local business e-commerce sites (e.g. bakeries, florists)
- Niche product stores (e.g. pet accessories, gadgets)
Blogs / Content-Based Sites
- Personal blogs
- Niche blogs (e.g., travel, tech, food, fashion)
- Affiliate marketing blogs
- SEO-focused content sites
- Review blogs (product reviews, comparisons)
- News sites (general or niche)
- Storytelling blogs / writing portfolios
- Lifestyle blogs
- Wellness or self-help blogs
Business / Local Services Sites
- Small business sites (plumbers, electricians, cleaners, etc.)
- Restaurant / café websites
- Real estate websites
- Construction company sites
- Law firm websites
- Dentist / doctor / therapist sites
- Freelancer / contractor landing pages
- Car dealership websites
- Consulting firm websites
- Pet services sites (grooming, training, sitting)
Portfolios / Resumes / CVs
- Freelancer portfolios (graphic design, writing, etc.)
- Photographer portfolios
- Videographer or filmmaker portfolios
- Online resumes or CVs
- Artist portfolios
- UX/UI designer showcases
Online Learning / Course Websites
- Online courses (LMS)
- Membership sites
- Coaching websites
- Tutorial sites (text or video)
- Certification program sites
- Educational blogs
- Digital academies (Udemy-style)
Media / Entertainment Sites
- Podcast websites
- Music artist or band sites
- Video gallery sites
- Radio station sites
- Streaming show promotion pages
- Fan sites for celebrities or games
Directories / Listings
- Localbusiness directories
- Job boards
- Classifieds sites (like Craigslist)
- Real estate listing sites
- Events directories
- Coupons and deals websites
Communities & Social Networks
- Forums (like Reddit)
- Q&A websites (like Quora)
- Niche social networks (e.g., for entrepreneurs, gamers)
- Dating websites
- Club or group websites
- Private communities / masterminds
Landing Pages & Funnels
- Lead generation pages
- Squeeze pages
- Webinar registration pages
- Product launch funnels
- Thank-you / upsell pages
- Freebie download pages (e.g., PDFs, checklists)
Agencies & Service Businesses
- Marketing gencies
- Web design agencies
- SEO agencies
- Content writing services
- Social media management services
- Virtual assistant services
- Video editing services
- Funnel building agencies
Nonprofits / Charities / Religious Sites
- Church websites
- Mosque / synagogue / temple sites
- Charity or donation websites
- Fundraiser or GoFundMe-style clones
- NGO websites
Finance / Money Sites
- Personal finance blogs
- Crypto / Web3 sites
- Investment tips sites
- Budgeting & savings tools blogs
- Loan / credit card affiliate sites
- Forex or stock trading signal sites
Health / Fitness / Wellness Sites
- Personal trainer sites
- Fitness coaching sites
- Yoga or meditation blogs
- Meal planning / nutrition sites
- Mental health sites
- Fitness courses or challenges
Tech / SaaS / Startup Sites
- App landing pages
- Software product websites
- AI tools showcase sites
- Tech startup sites
- Beta signup landing pages
- API documentation pages
- Product comparison sites
Event / Booking Sites
- Event registration pages
- Conference or summit sites
- Wedding sites
- Virtual summit or webinar sites
- Coaching call booking sites
- Online appointment schedulers
Travel / Booking Sites
- Travel blogs
- Travel agency sites
- Tour booking sites
- Digital nomad sites
- Airbnb clones or vacation rental listings
- Travel guides / itineraries
Pet / Animal-Related Sites
- Pet blogs
- Pet adoption sites
- Pet e-commerce stores
- Dog training businesses
- Vet clinic websites
DIY / Craft / Hobby Niches
- DIY tutorial blogs
- Craft stores
- Homesteading sites
- Gardening blogs
- Model-building or collectibles sites
Spiritual / Esoteric / New Age Sites
- Tarot reading sites
- Astrology / numerology sites
- Energy healing services
- Spiritual coaching sites
As you can see, you can build almost any type of website — or even make money by creating online stores for others.
2. LETS START BUILDING WORDPRESS
Hello! Today, I’m going to teach you step-by-step how to start your own website from A to Z — easily.
I'll also share some alternative tips to help you save money, including how to test things out as cheaply as possible if you're just getting started.
This guide will consist of 4 parts:
- Setting up hosting and a domain
- cPanel basics
- Installing WordPress
- Building your website
Before we dive into the full tutorial, here’s a quick overview:
- Get hosting – This is where your website’s files will be stored online 24/7.
- Get a domain – This is your website’s address, like www.yourdomain.com.
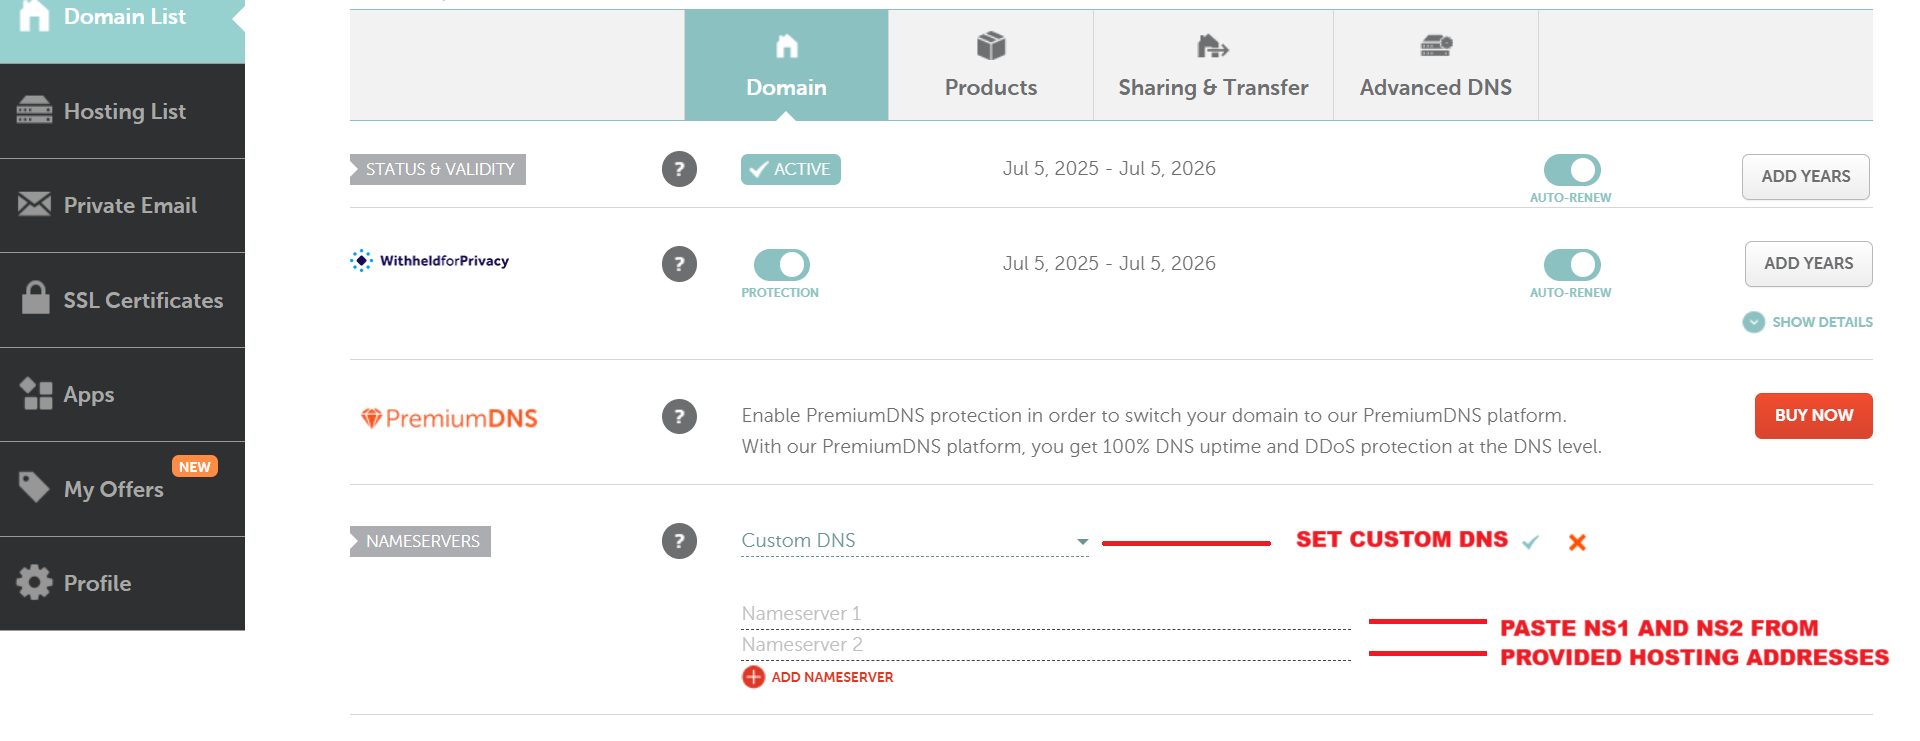
- Connect hosting to your domain – You'll receive two nameservers from your hosting provider (usually starting with NS1, NS2, etc.). Add these to your domain’s custom DNS settings to link them together.
- Access cPanel – After purchasing hosting, you’ll get a link to access your cPanel. Think of cPanel as the user-friendly dashboard for your hosting, like Windows or macOS for your computer. It replaces the need to use complicated code.
- Add your domain – In cPanel, go to the “Domains” section and add your domain.
- Scroll down and click on WordPress – You’ll find this in the app installer section.
- Install WordPress – Follow the simple steps to install it.
- Start building your website – You're now ready to customize and launch your site!
This will take about 5–10 minutes to read, so take a moment to focus — no laziness!
I’m doing my best to explain everything as simply and clearly as possible, so this should really help you in your website-building journey.
I'll also include a video that follows the exact same steps.
Why both? Because reading and watching activate different parts of your brain — combining them will help you understand and remember everything much better.
When you’re just starting out, it might seem like a lot — but really, it’s just a few simple steps.
With this guide, you'll see how straightforward it actually is and feel confident in no time.
To get your website ready, you’ll need three main things:
1. Hosting is like a computer that runs 24/7 to keep your website online. A domain is your website’s address — like yourstore.com.
2.We have access to thousands of GPL (open-license) plugins and themes, which can save you hundreds or even thousands of dollars during testing. These are pre-made and ready to install — just tweak some text and images, and you’ll have a professional-looking website in no time.
Recommended Hosting & Domain Options:
Option 1: Namecheap.com
- Great for affordable hosting and cheap domain names
- Domains like .store can cost as little as $1–$2/year, while .com is around $12/year
- Hosting starts at around $4.50/month. However, it’s limited to 3 domains. The yearly plan offers a cheaper first year but renews at a higher price.
- Great if you want everything in one place — domain + hosting
Option 2: https://my.hostbrr.com/order/main/packages/cpanel/?group_id=46
- One of the cheapest hosting deals out there
- $10/year for 10GB NVMe storage with unlimited everything — less than $1/month
- Perfect for multiple websites or testing projects
- If you need more space, upgrade to their $15 or $20 plan. But 10GB is plenty for most users—owning 50 websites won’t use up all that space.
You can mix and match — for example, buy cheap domains from Namecheap and use Hostbrr for hosting. That’s what I personally do. I use Namecheap for domains like .store, which are perfect for testing or launching eCommerce businesses at a super low cost.
Another great domain provider is NameBright. They often have the best deals for premium domains like .com, which is considered one of the most trusted and professional extensions.
Step 1: Buy Hosting
Whether you choose Namecheap, Hostbrr, or another provider, once you purchase hosting, you’ll get:
- Your cPanel login
- Your DNS (nameserver) addresses
If you don’t have a domain yet, you can still proceed with buying hosting by entering a random domain during checkout — you’ll connect the real one later.
After purchasing your domain, you’ll receive your hosting details, which will look something like this:

Your cPanel login details will allow you to access your hosting dashboard.
You might be wondering: What is cPanel?
Think of it like Windows for your hosting — instead of typing complicated commands into a black screen like they did decades ago, cPanel gives you a simple, user-friendly interface to manage everything.
Connecting Your Domain to Your Hosting
Once you purchase hosting, you'll receive two nameservers (usually labeled something like NS1 and NS2).
When you buy a domain, you need it to point to your hosting. Here's how:
- Go to your domain's DNS or nameserver settings.
- Paste the two nameservers into the first and second fields.
- Save the changes — that’s it! Your domain and hosting are now connected.
Logging Into cPanel
Now, let’s log in to cPanel.
If this is your first time, it might feel a little overwhelming — but don’t worry.
I’ll walk you through everything step by step:
- How to install your website (WordPress)
- How to use the File Manager
- How to add domains
- How to change upload settings in the PHP INI Editor
For anything else, just ask ChatGPT — seriously. You can type in what you're trying to do, and it’ll guide you through it easily.

1.
This tool lets you upload, manage, and edit files on your server — just like a file explorer on your computer. There’s not much else to it; it’s straightforward and easy to use.
2.
In this section, you’ll add or remove domains from your hosting.
- Remember: After connecting your domain to your hosting via nameservers, you’ll need to create a directory for it here in cPanel.
- To do this, go to the Domains section and click “Create a New Domain.”
- Important: Always uncheck the box at the bottom that says something like “Share document root…” — this ensures each domain gets its own folder and doesn’t interfere with others.
3.
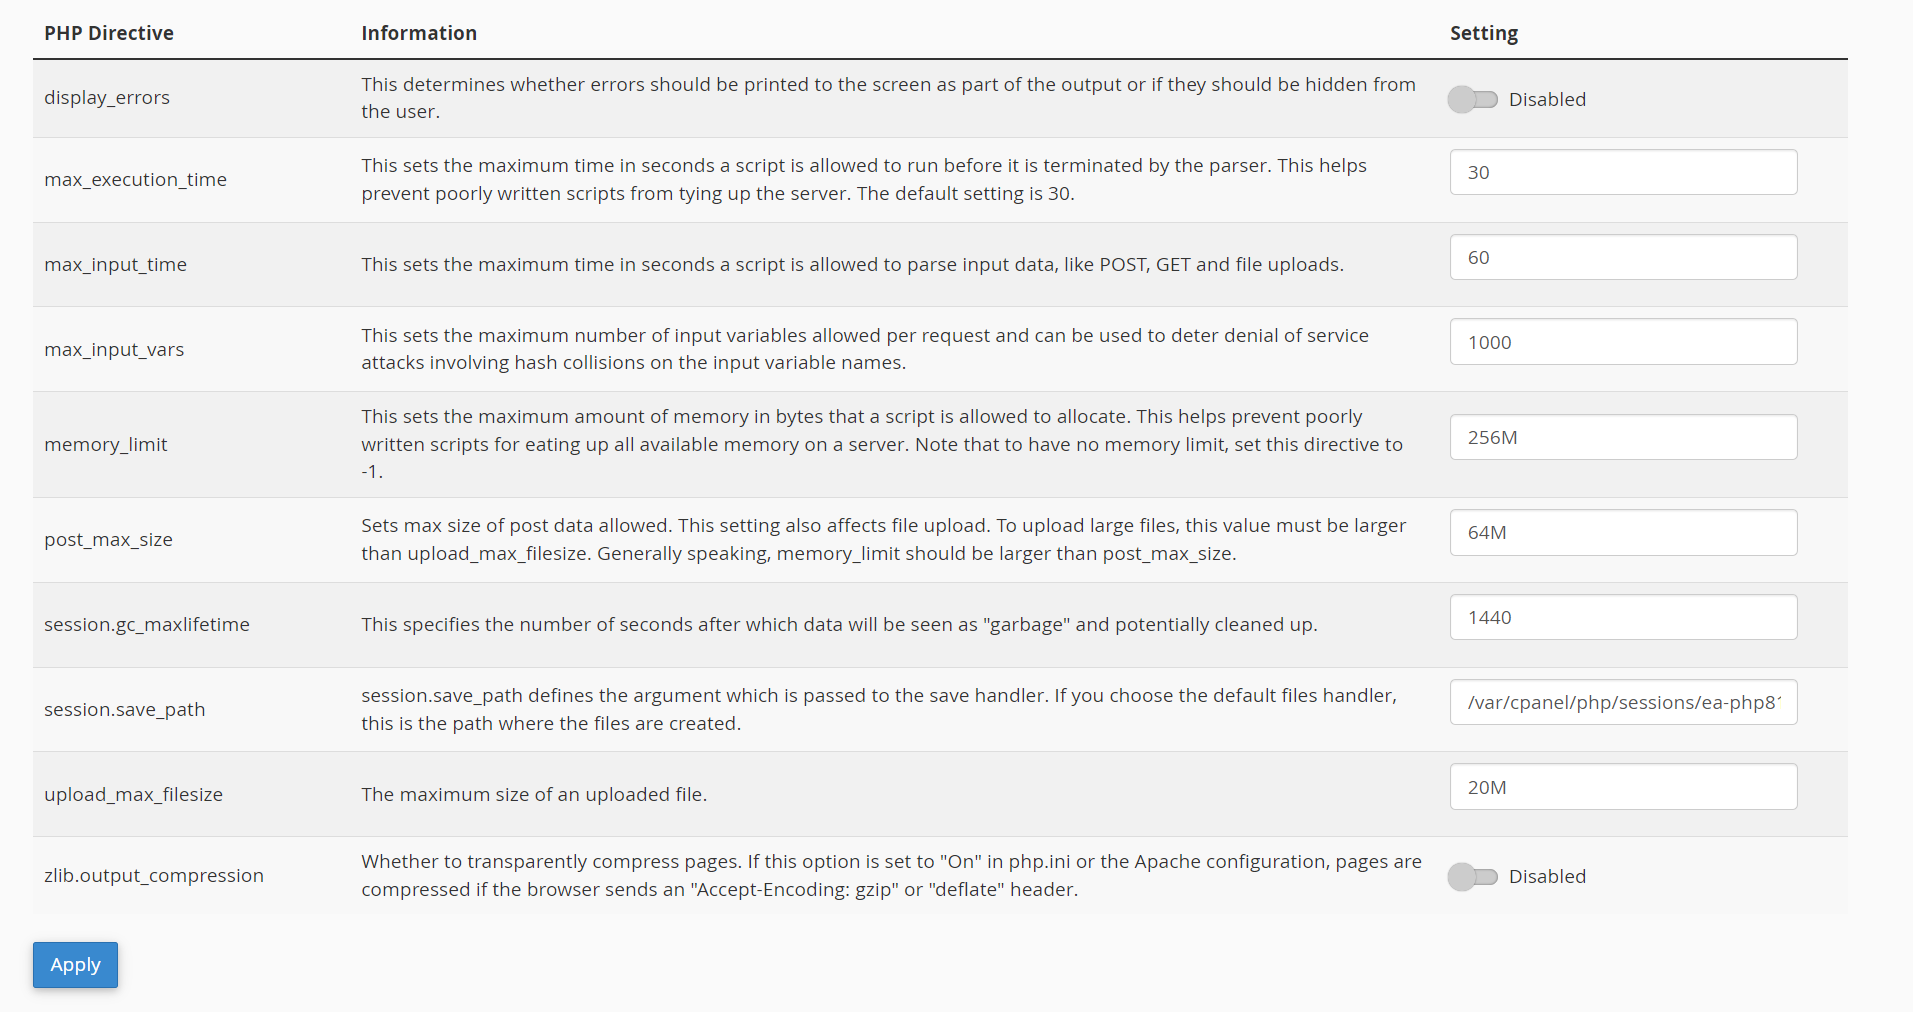
This tool controls some key PHP settings that affect how WordPress works.
For example:
- If you’re trying to upload a theme or plugin and it fails, it’s likely because the upload limit is too low.
- By default, the upload_max_filesize might be set to just 2MB — but many themes are 5MB or more.
- You can increase it to 20MB, 100MB, or even 500MB, depending on your needs.
- Also update post_max_size to a higher value to allow larger uploads.
- Max execution time to 300.
These two are the most important values when uploading larger files.
4.
Click on “WordPress” in cPanel, and it will take you to the WordPress installer window.Here you’ll see all your current installations and have the option to install new ones or delete old ones.
The installer will automatically:
- Create the necessary WordPress files and folders,
- Set up the directory in File Manager,
- And handle the basic configuration for you.
All you need to do is choose your own options during setup — like your site name, admin username, and password.
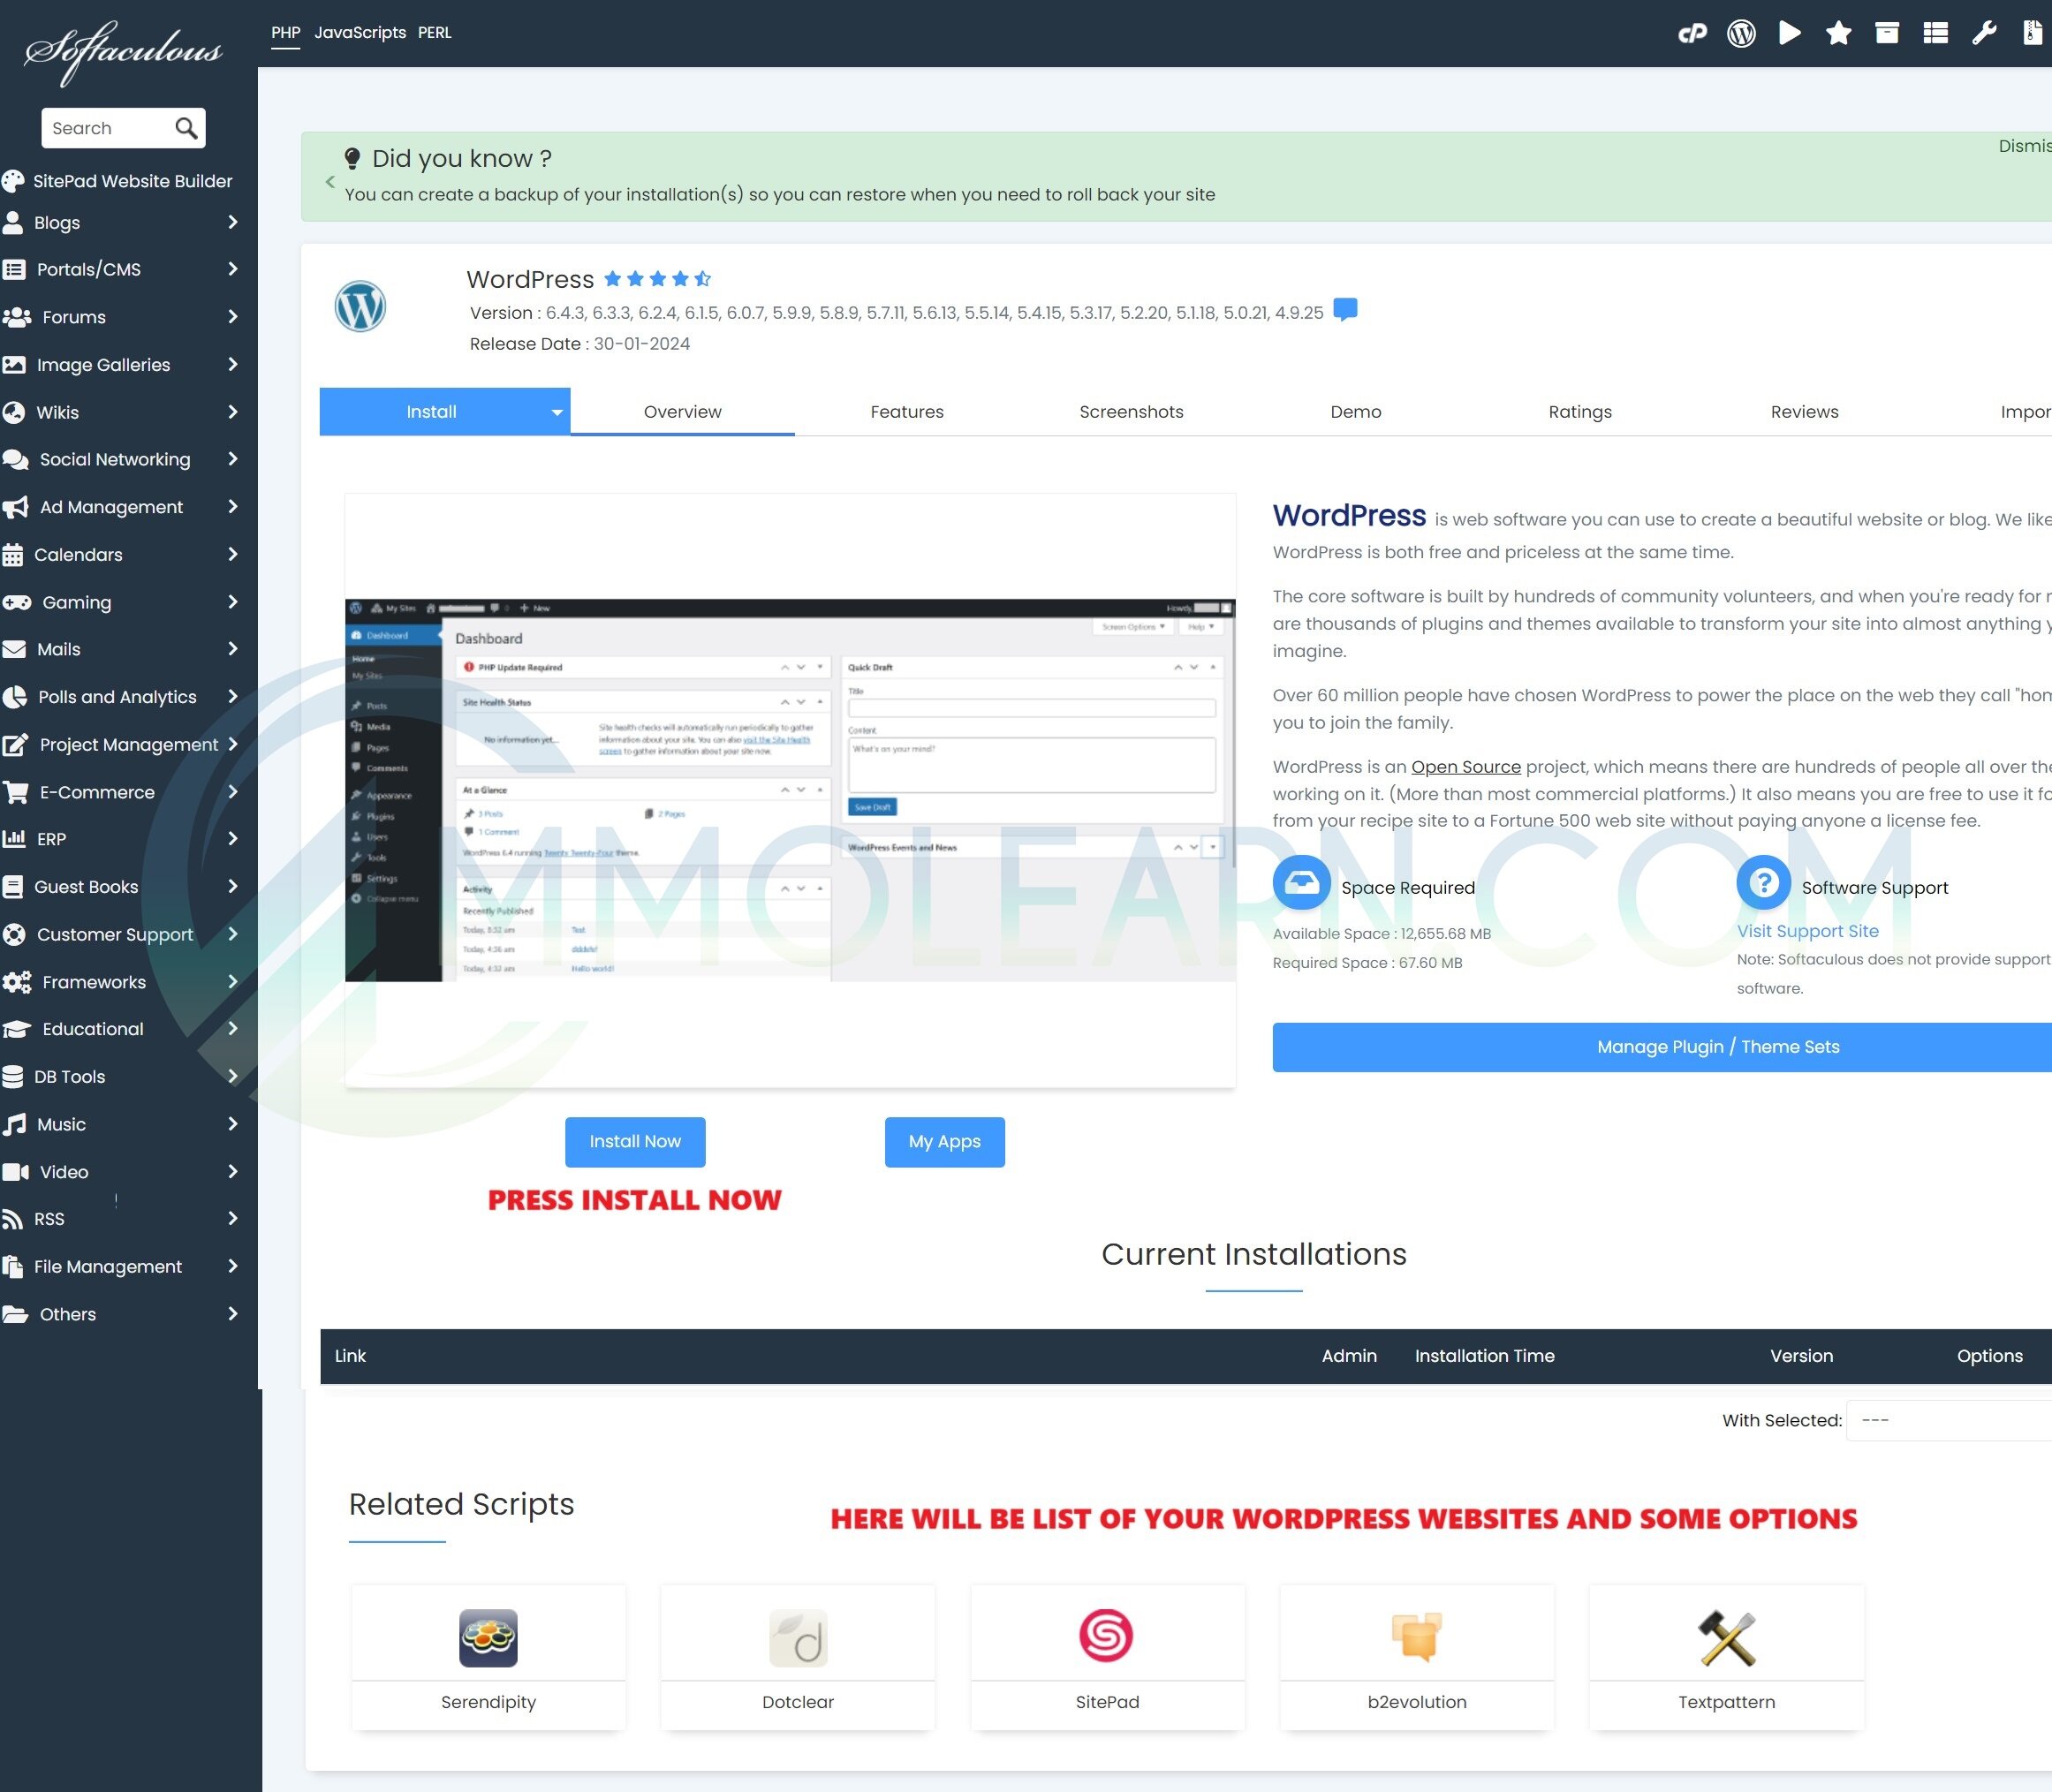
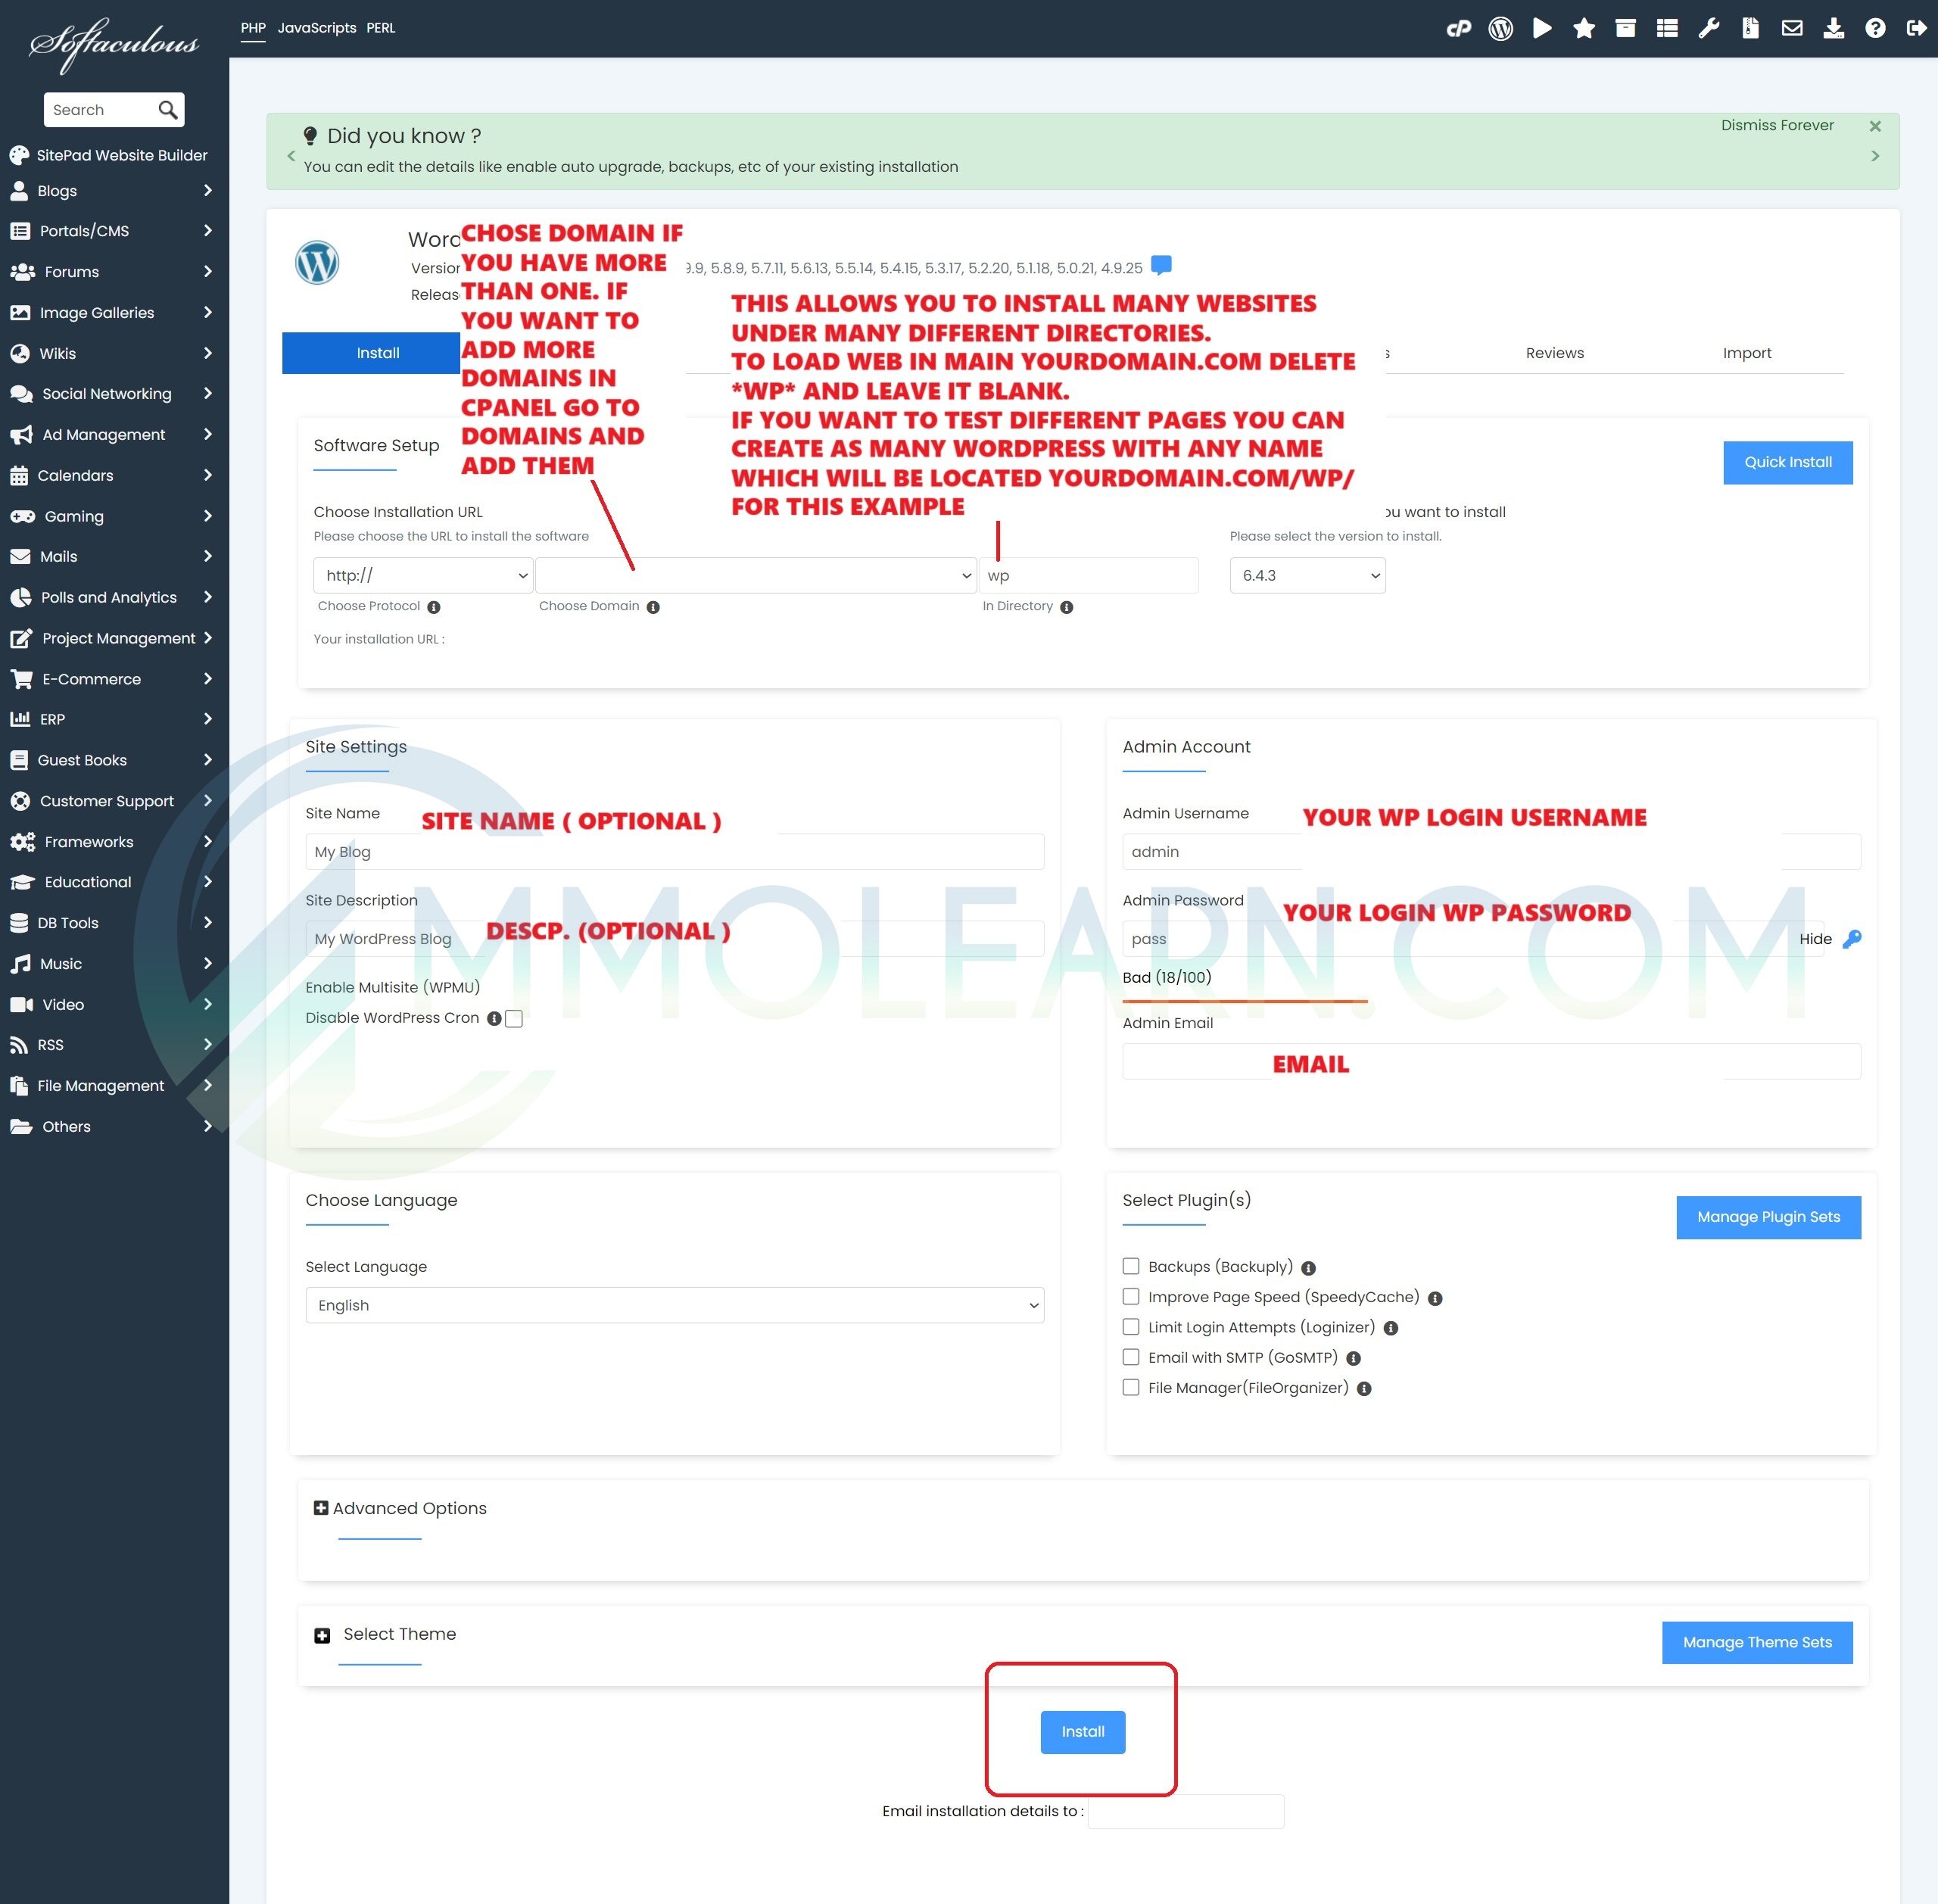
WordPress Installation – "Install Now" Window
Once you click “Install Now,” you’ll see the WordPress installation setup screen.
1.
Use the dropdown to select the domain you want to install WordPress on. This is useful if your hosting account has multiple domains.2.
By default, it might show “wp” in the directory field.- Remove "wp" if you want your website to load directly at yourdomain.com.
- If you leave “wp” or type in another name, WordPress will install in a subdirectory — like yourdomain.com/wp or yourdomain.com/test.
- You want to test different websites under one domain.
- You plan to install multiple WordPress sites (e.g., a store, a blog, a course site, etc.) using folders like /1, /2, /3, etc.
This way, instead of cluttering a single WordPress site with too many themes and plugins, you can keep each project separate and clean.
3.
- Site Name: Example – Fashionova
- Site Description: Example – Fashion Accessories
4.
- Choose a username and password — these will be your WordPress login details.
- Enter your admin email for notifications and password recovery.
Once your installation is complete, you’ll see this window.
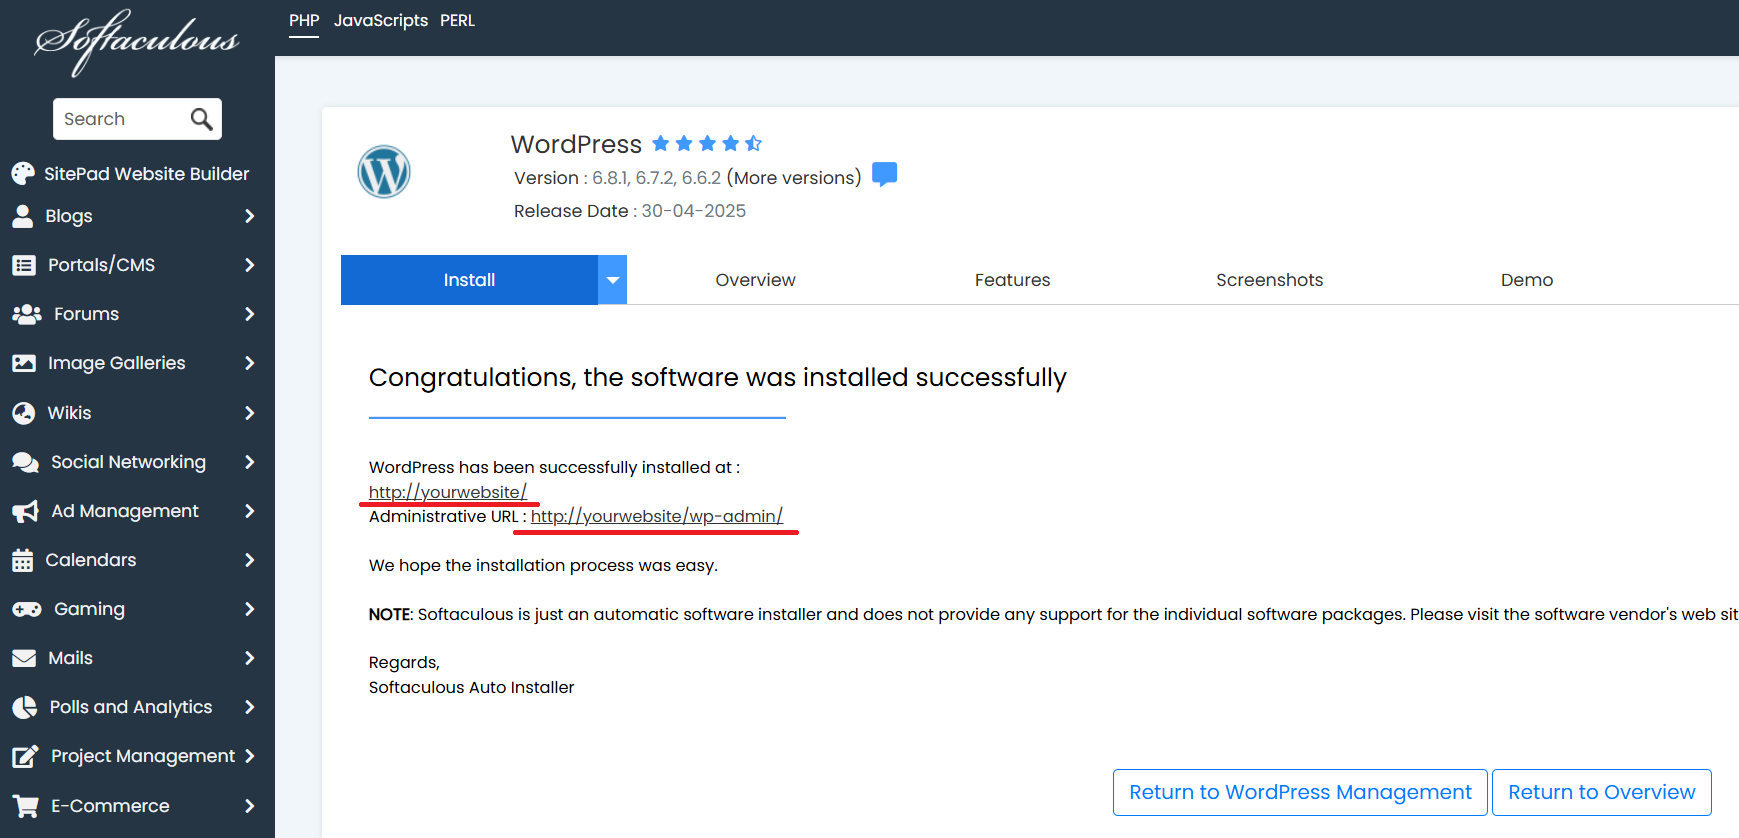
The first link is your website’s homepage.
The second link ends with /wp-admin/ — this is your WordPress dashboard.
From the dashboard, you can install plugins and themes, design your store, and manage everything on your site.
Let’s go to /wp-admin/ now.
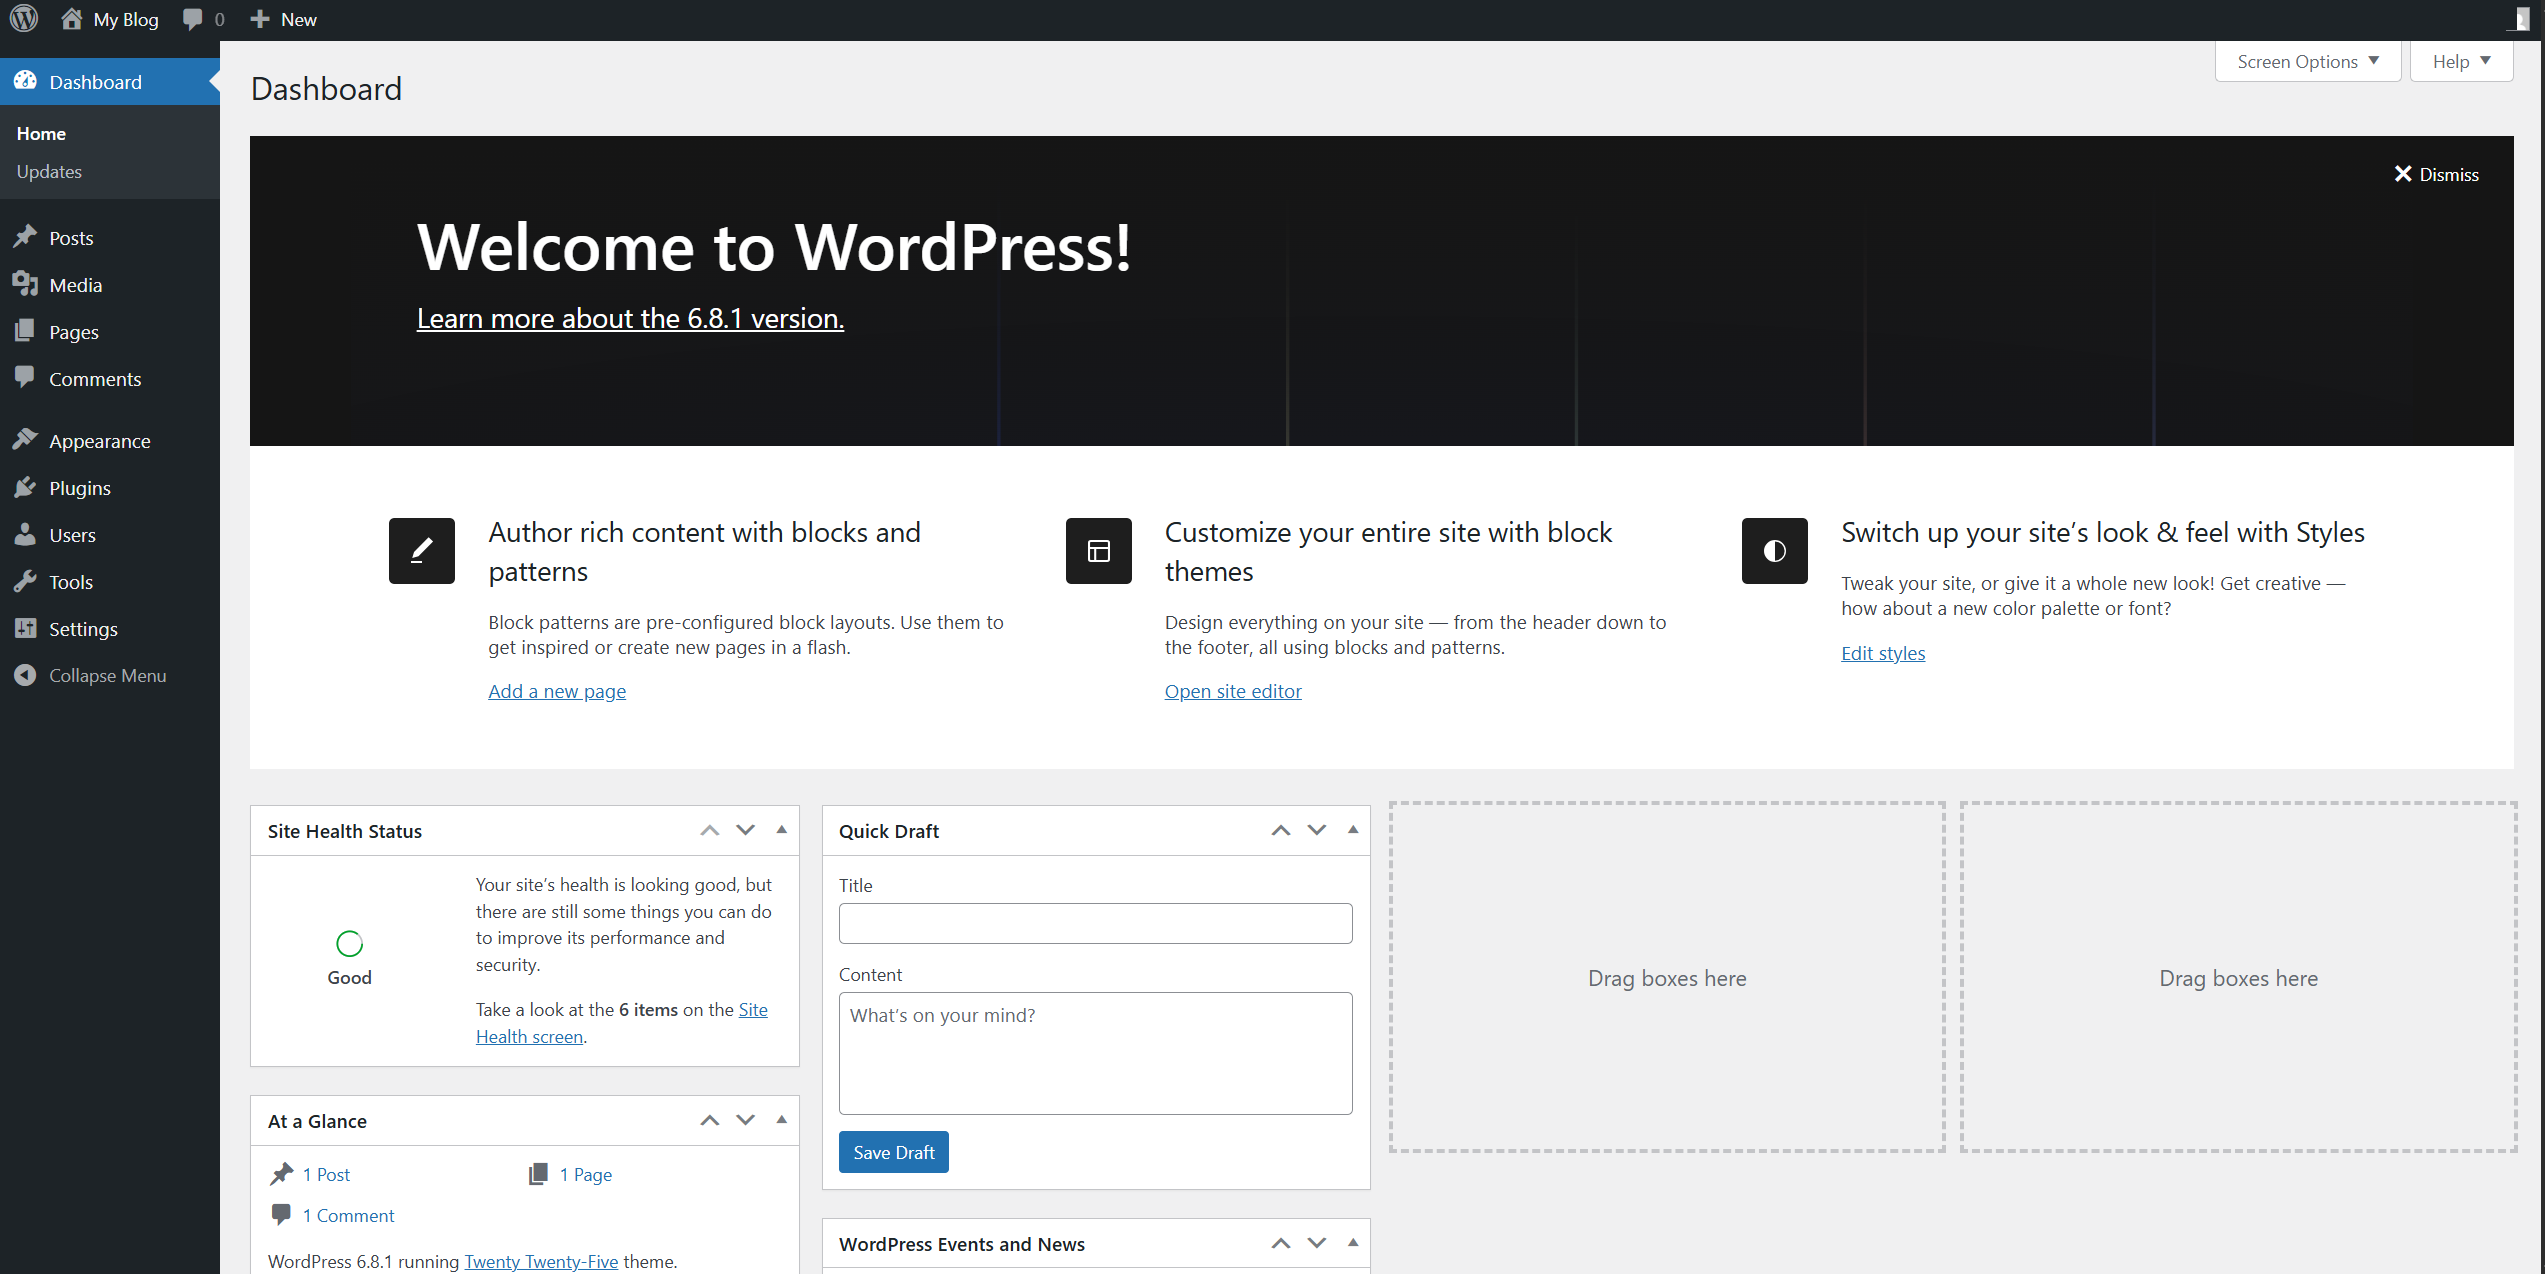
Welcome to your WordPress dashboard!
Here’s a quick overview of the main sections:
- Posts – This is where you create and manage blog posts for your website.
- Media – All your uploaded files, such as images, videos, and audio, are stored here. This includes content from imported themes.
- Pages – Here you create, edit, and delete individual pages (e.g., homepage, About Us, Product Page). Each page is separate, and later, you can organize them into menus.
- Comments – Manage comments left on your blog posts.
- Appearance – Upload and customize your themes here.
- Plugins – Manage and install plugins to add new features to your site.
- Users – View and manage all registered users on your site.
- Tools – Access additional tools that support various WordPress functions.
- Settings – Adjust site-wide settings such as your website name and homepage.
Important:
By default, WordPress sets your blog page as the homepage.
To change this:
Go to Settings > Reading > Your homepage displays > Select "A static page" and choose the page you want as your homepage.
How to Download "Betheme" from MMOLEARN
- Go to the MMOLEARN website.
- In the search bar, type "Betheme" (either a plugin or theme).
- Click Download in the top-right corner of the window.
- You’ll get a .zip file (WinRAR format).
 Do not extract it. You’ll upload this file directly to WordPress later.

Now let’s upload and install the demo theme you downloaded earlier.
- Go to Appearance > Themes in your WordPress dashboard.
- Click on “Add New”, then “Upload Theme.”
- Choose the .zip file you downloaded earlier (do not extract it).
- Click Install Now, then Activate once the installation is complete.
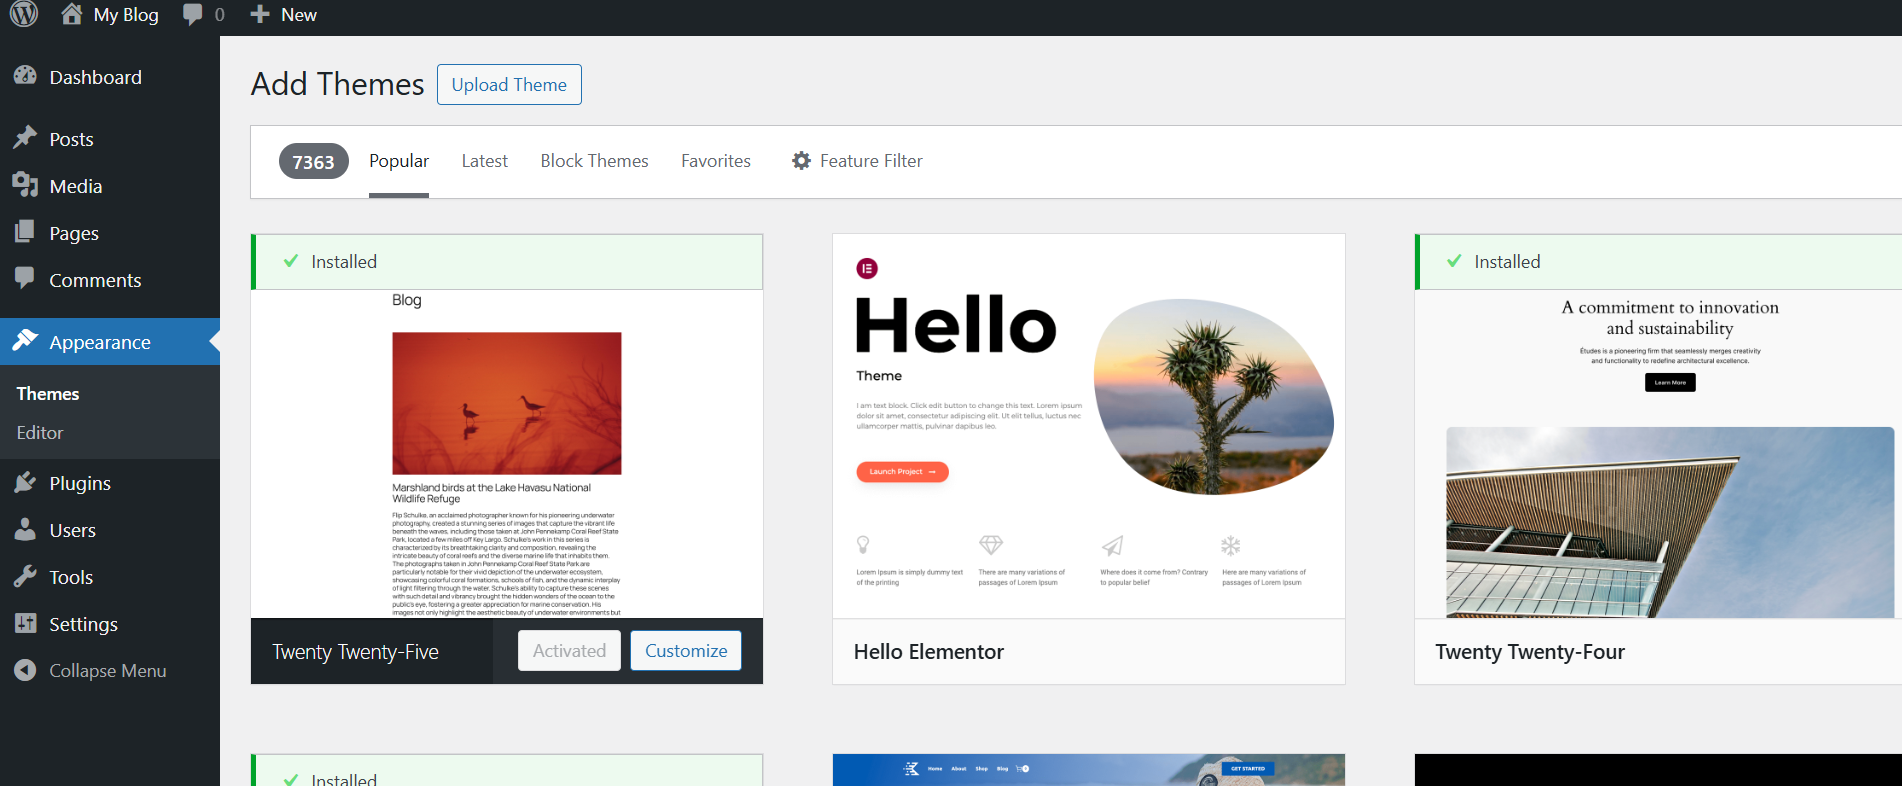
Once it's done, click “Activate.”
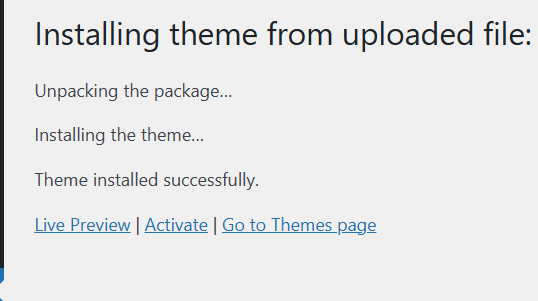
Great! The theme is now installed and activated.
Next, go to the “Betheme” section in the left-hand menu and click on “Pre-built Websites.”
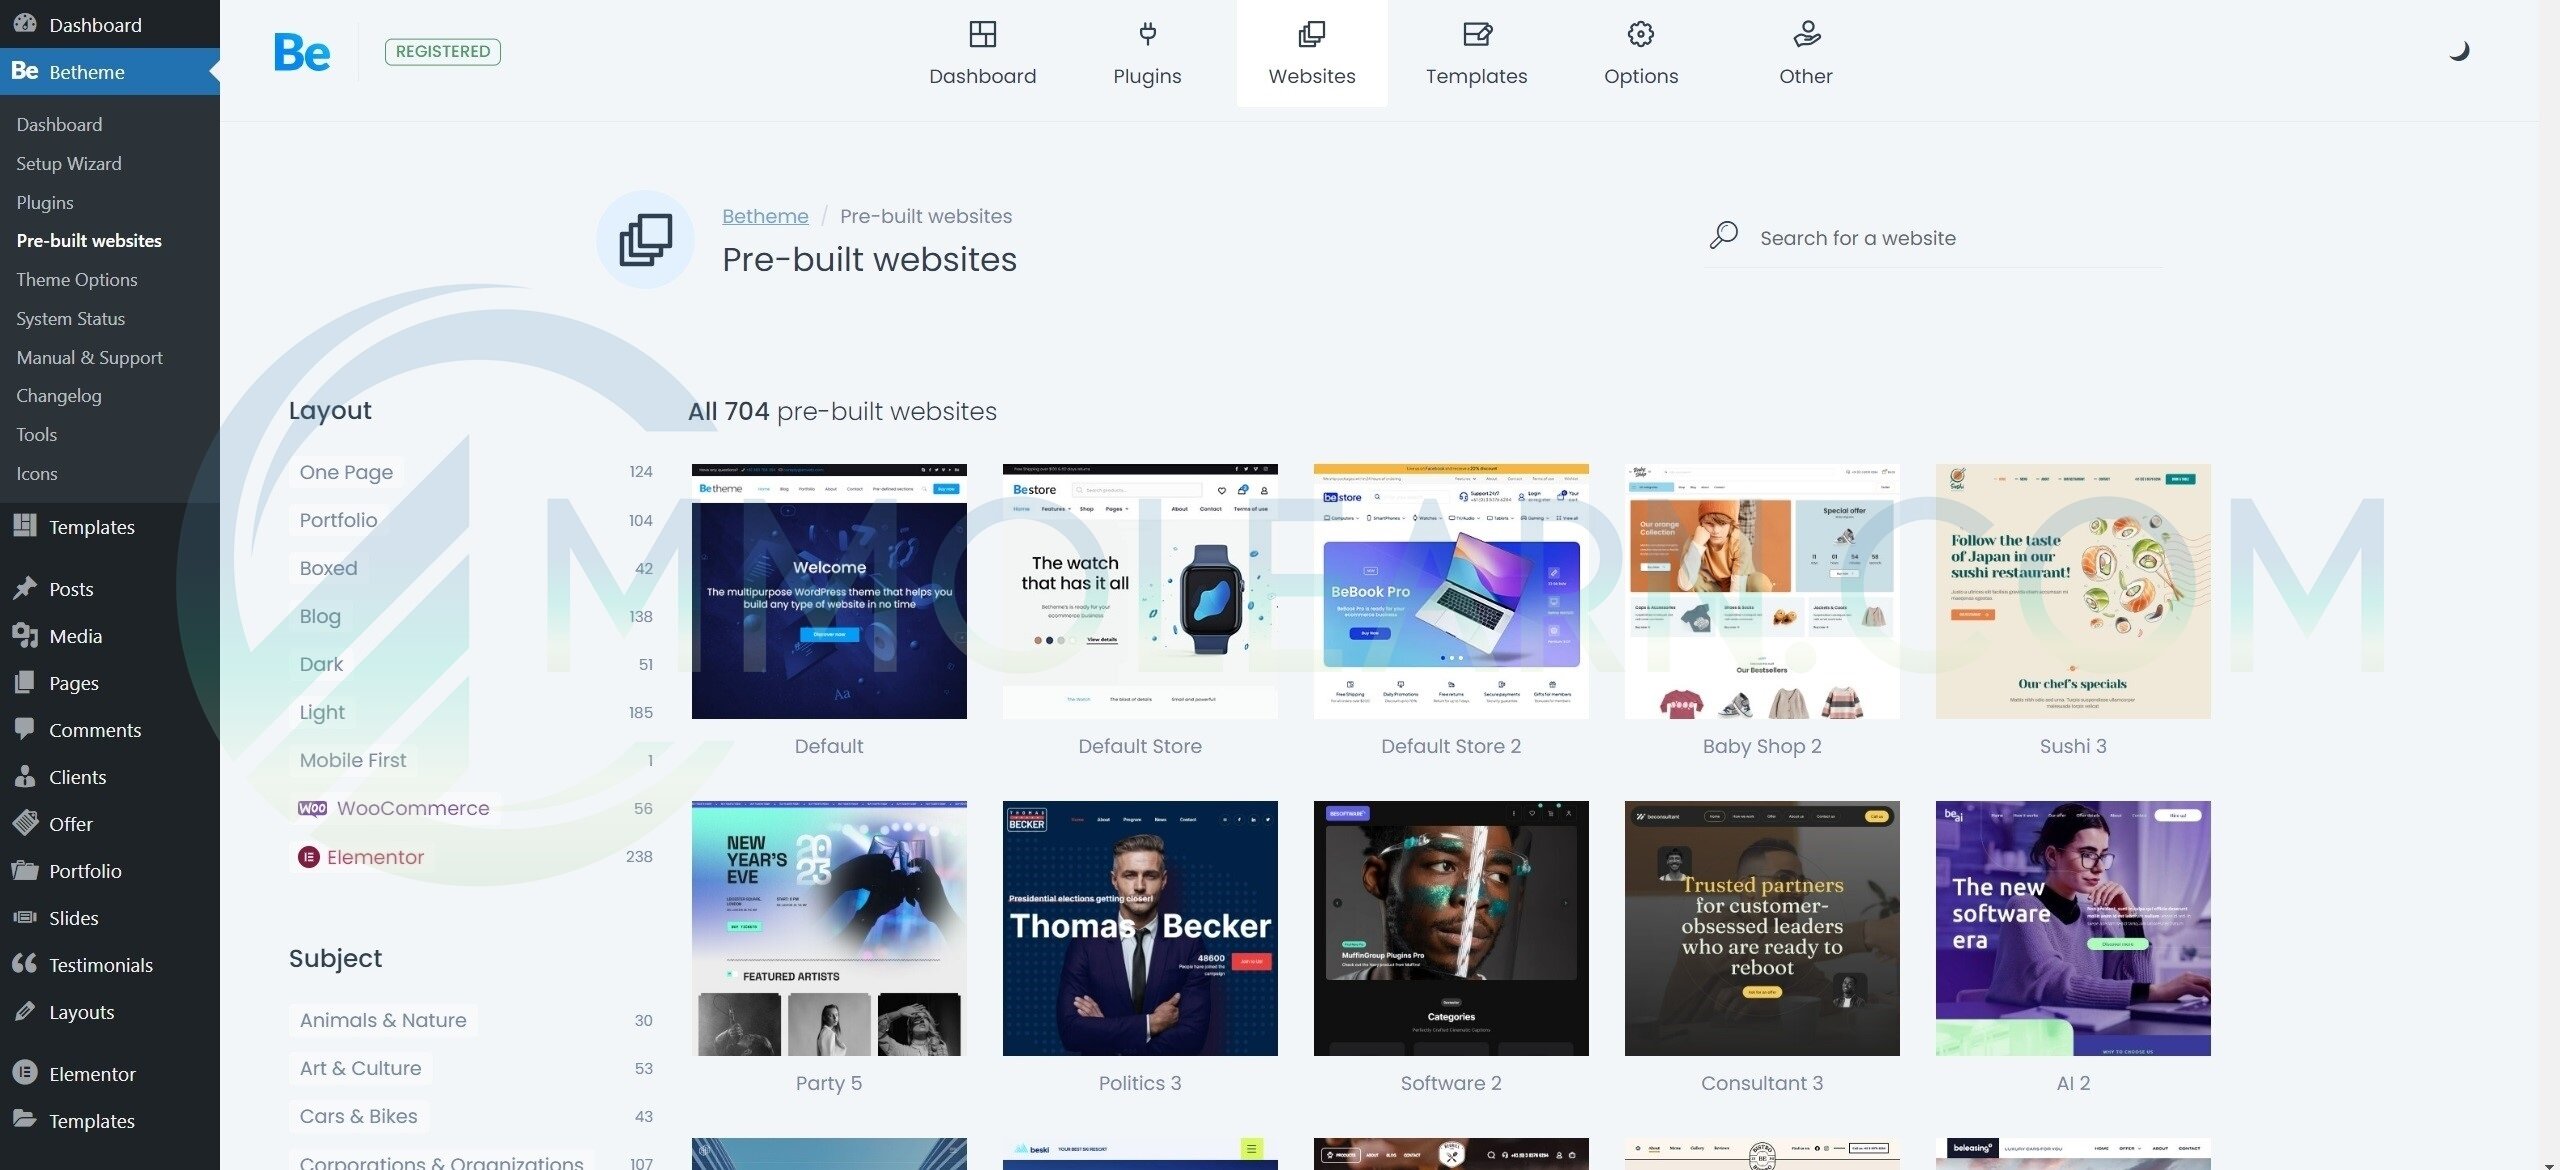
As you can see, there are over 700 pre-built websites for any niche.
Select the one you like and click on it. A window will pop up — select BeBuilder, then click “Next Step.”
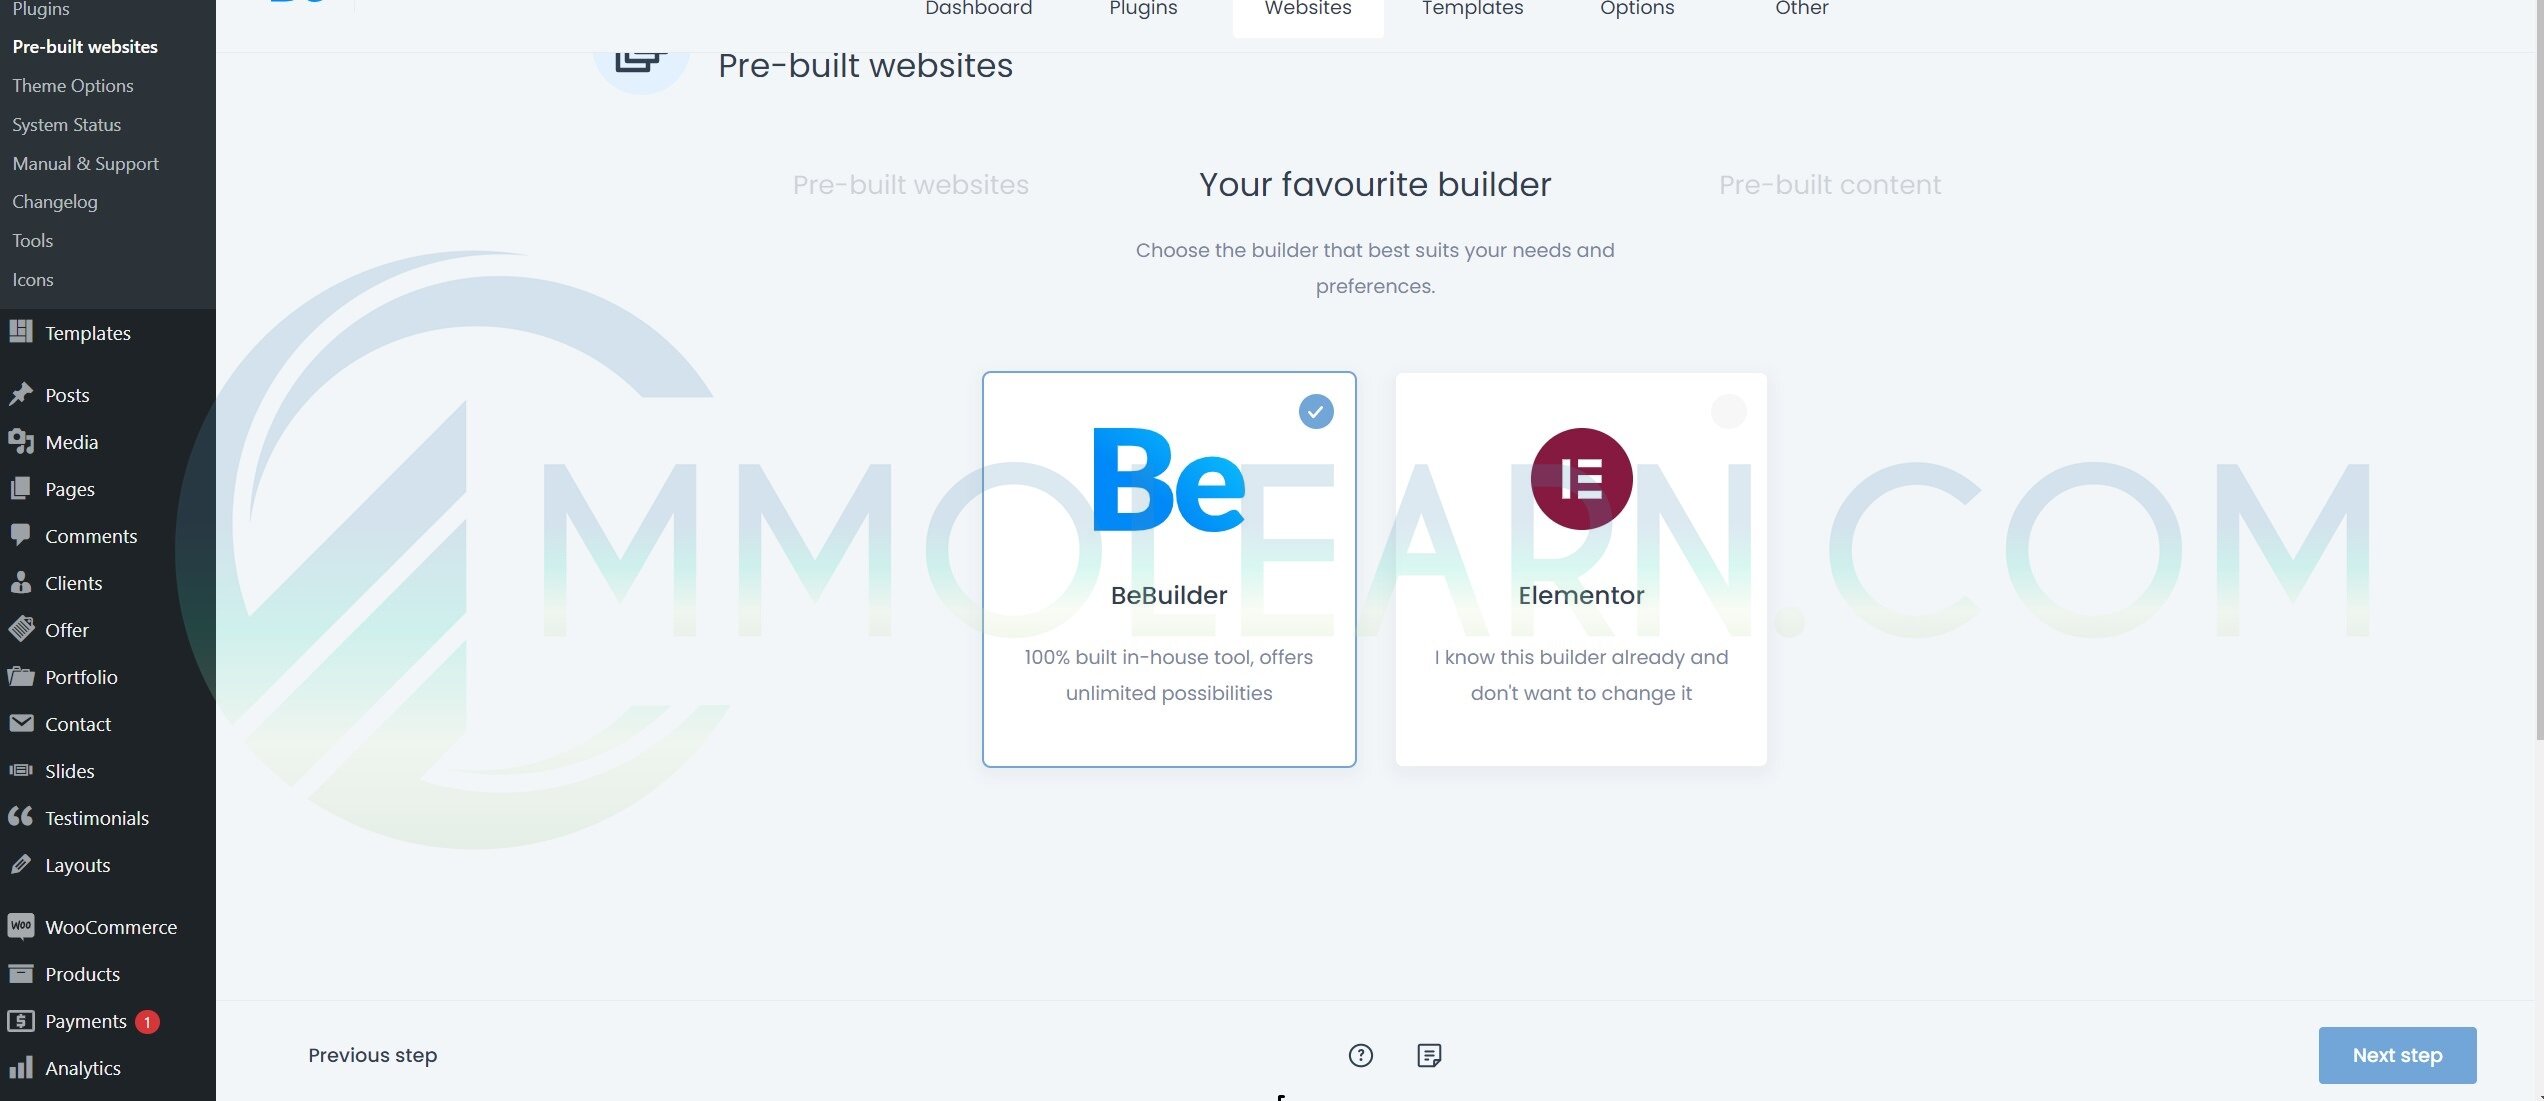
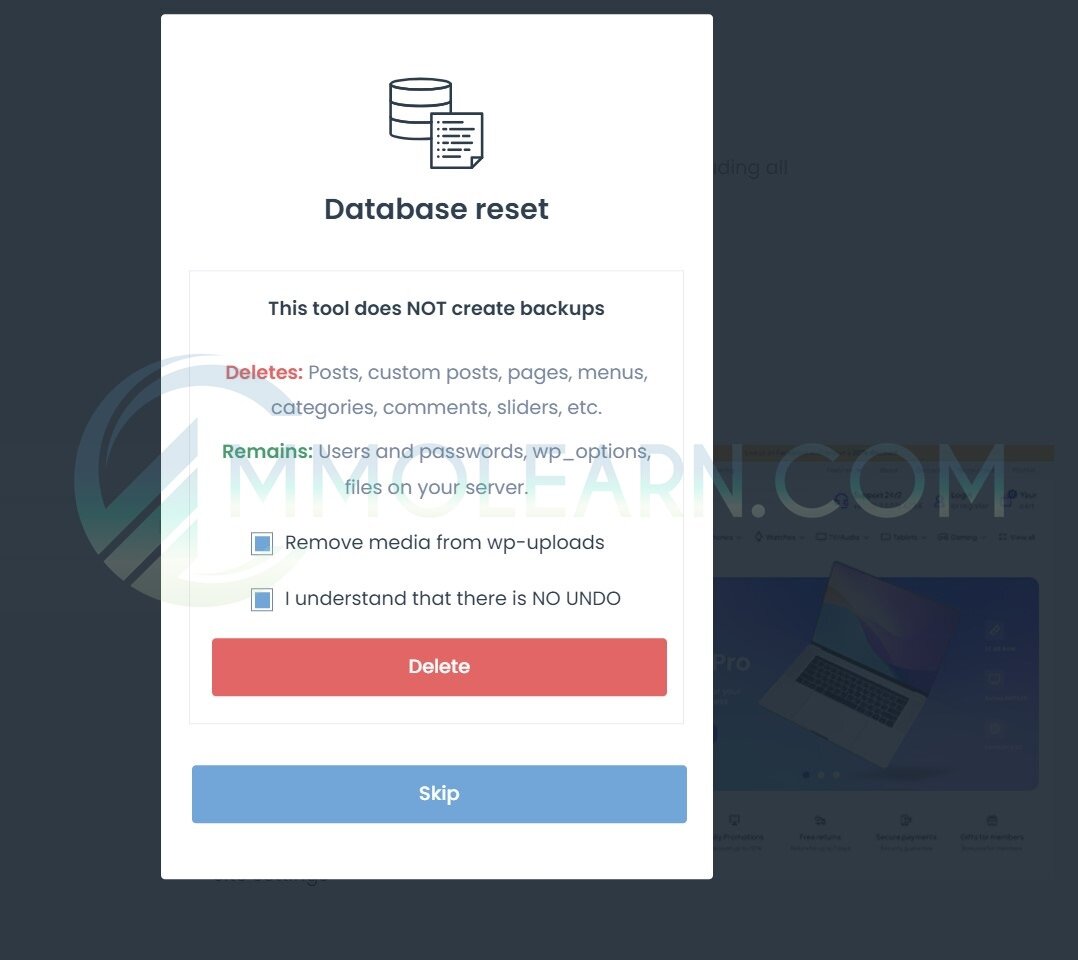
When trying out different themes, make sure to select "Remove media..." and "I understand...", then click "Delete and Continue."
When the installation is finished, you will see this window.
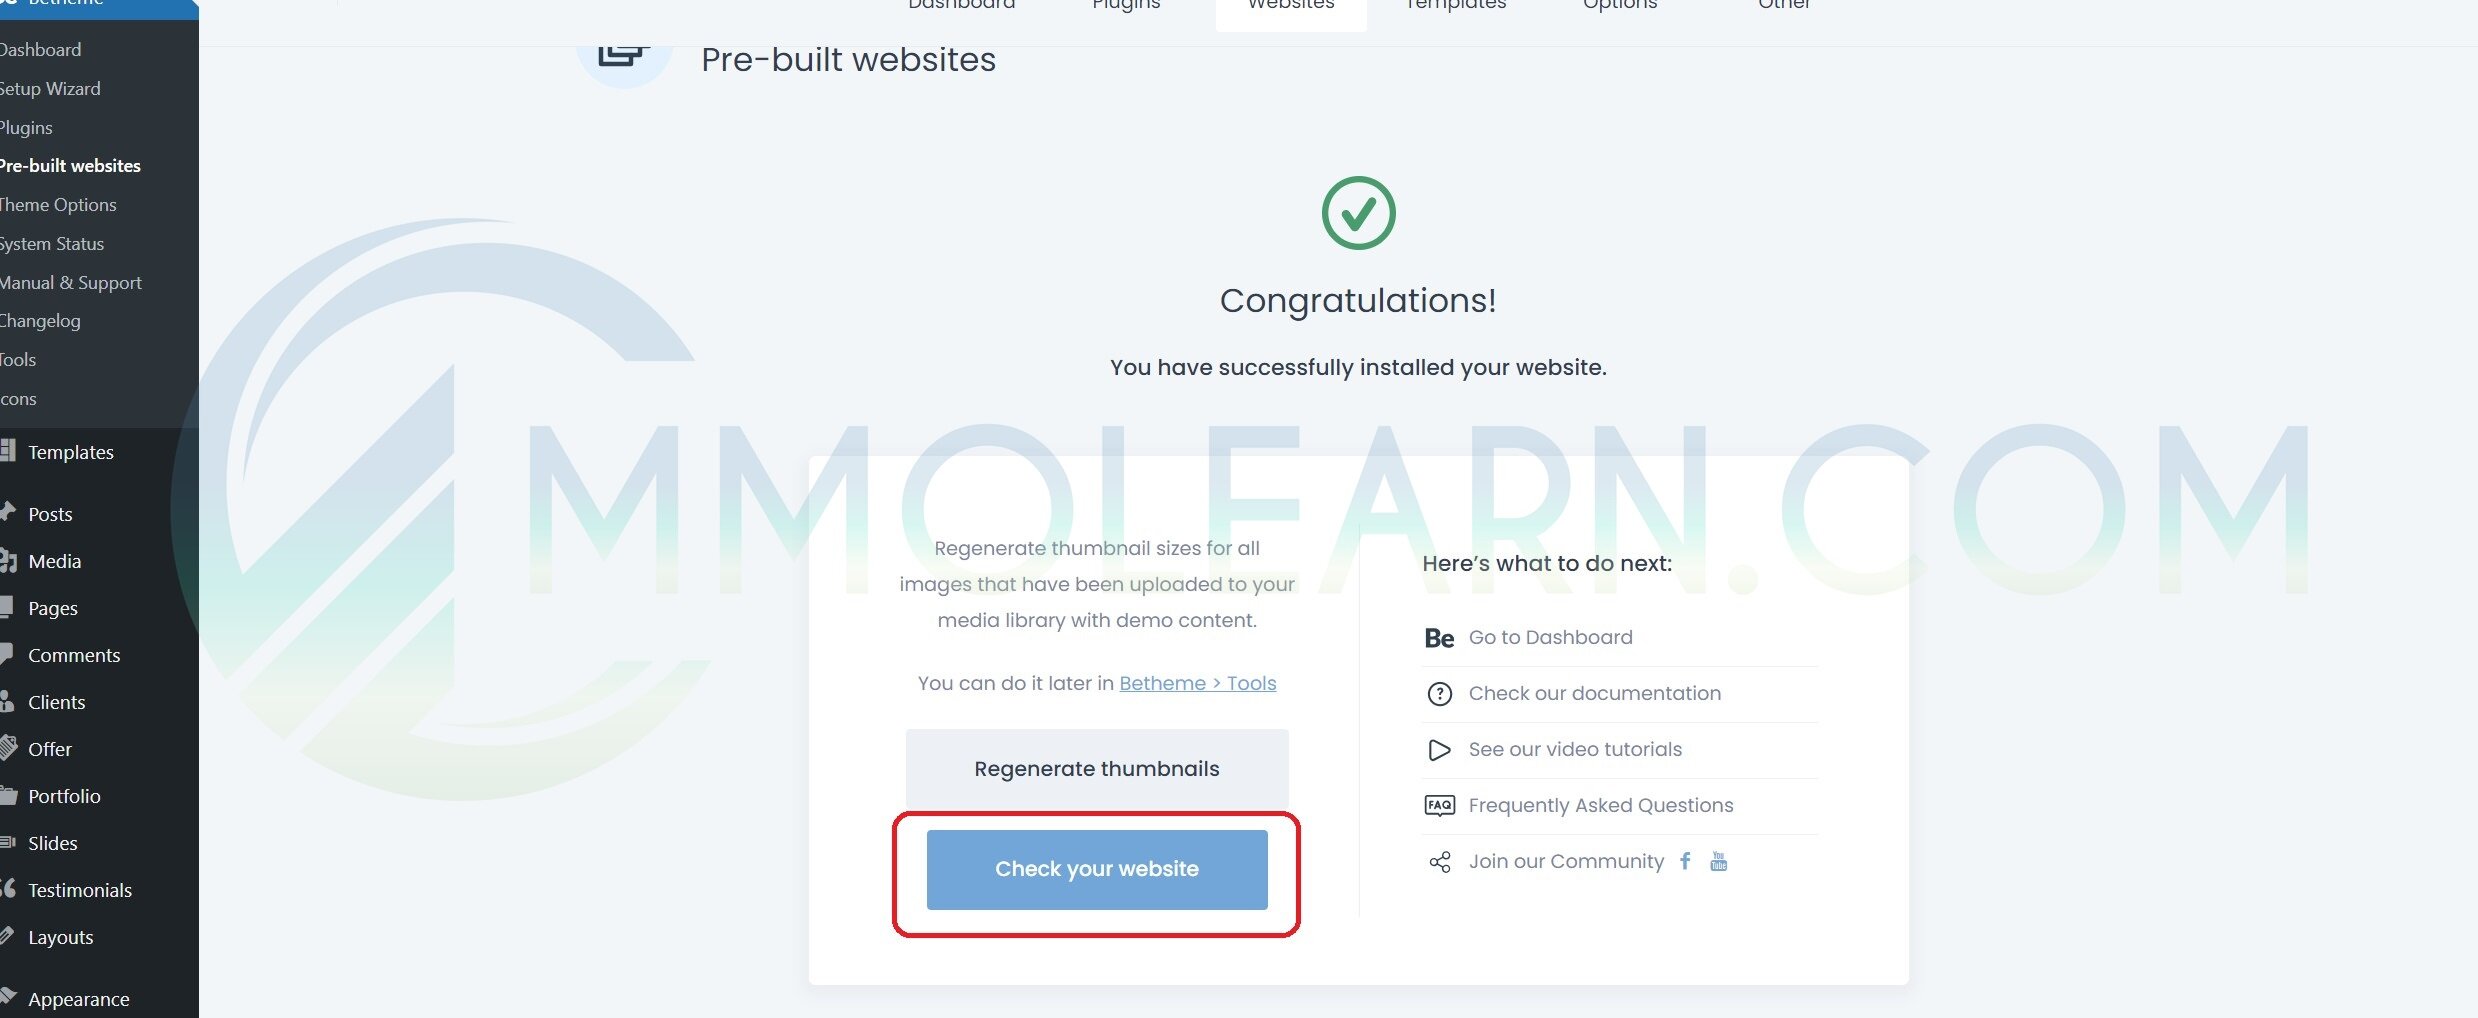
Click on “Check your website” and there you go — a professional-looking website that would normally cost thousands to develop.
With the built-in builder, you can add or remove sections, change text, replace images, and customize everything to your liking.
And just like that, you have your website! Over 700+ Different niches just from this, thousands of themes in MMOLEARN.COM
